How to Make and Manage Payments in MyUI Employer+
After submitting a wage report your premiums will automatically be calculated and can be paid online in MyUI Employer+.
There are two ways to pay premiums:
- Pay online in MyUI Employer+ using your bank account information.
- Print a payment voucher in MyUI Employer+ and mail a paper check.
How to Submit an Online Payment
Step 1. Access Payment Screens
- Login to your employer account in MyUI Employer+ to open your Employer Home page.
- Click the “Payment Information Home” tab in the left-hand navigation menu.
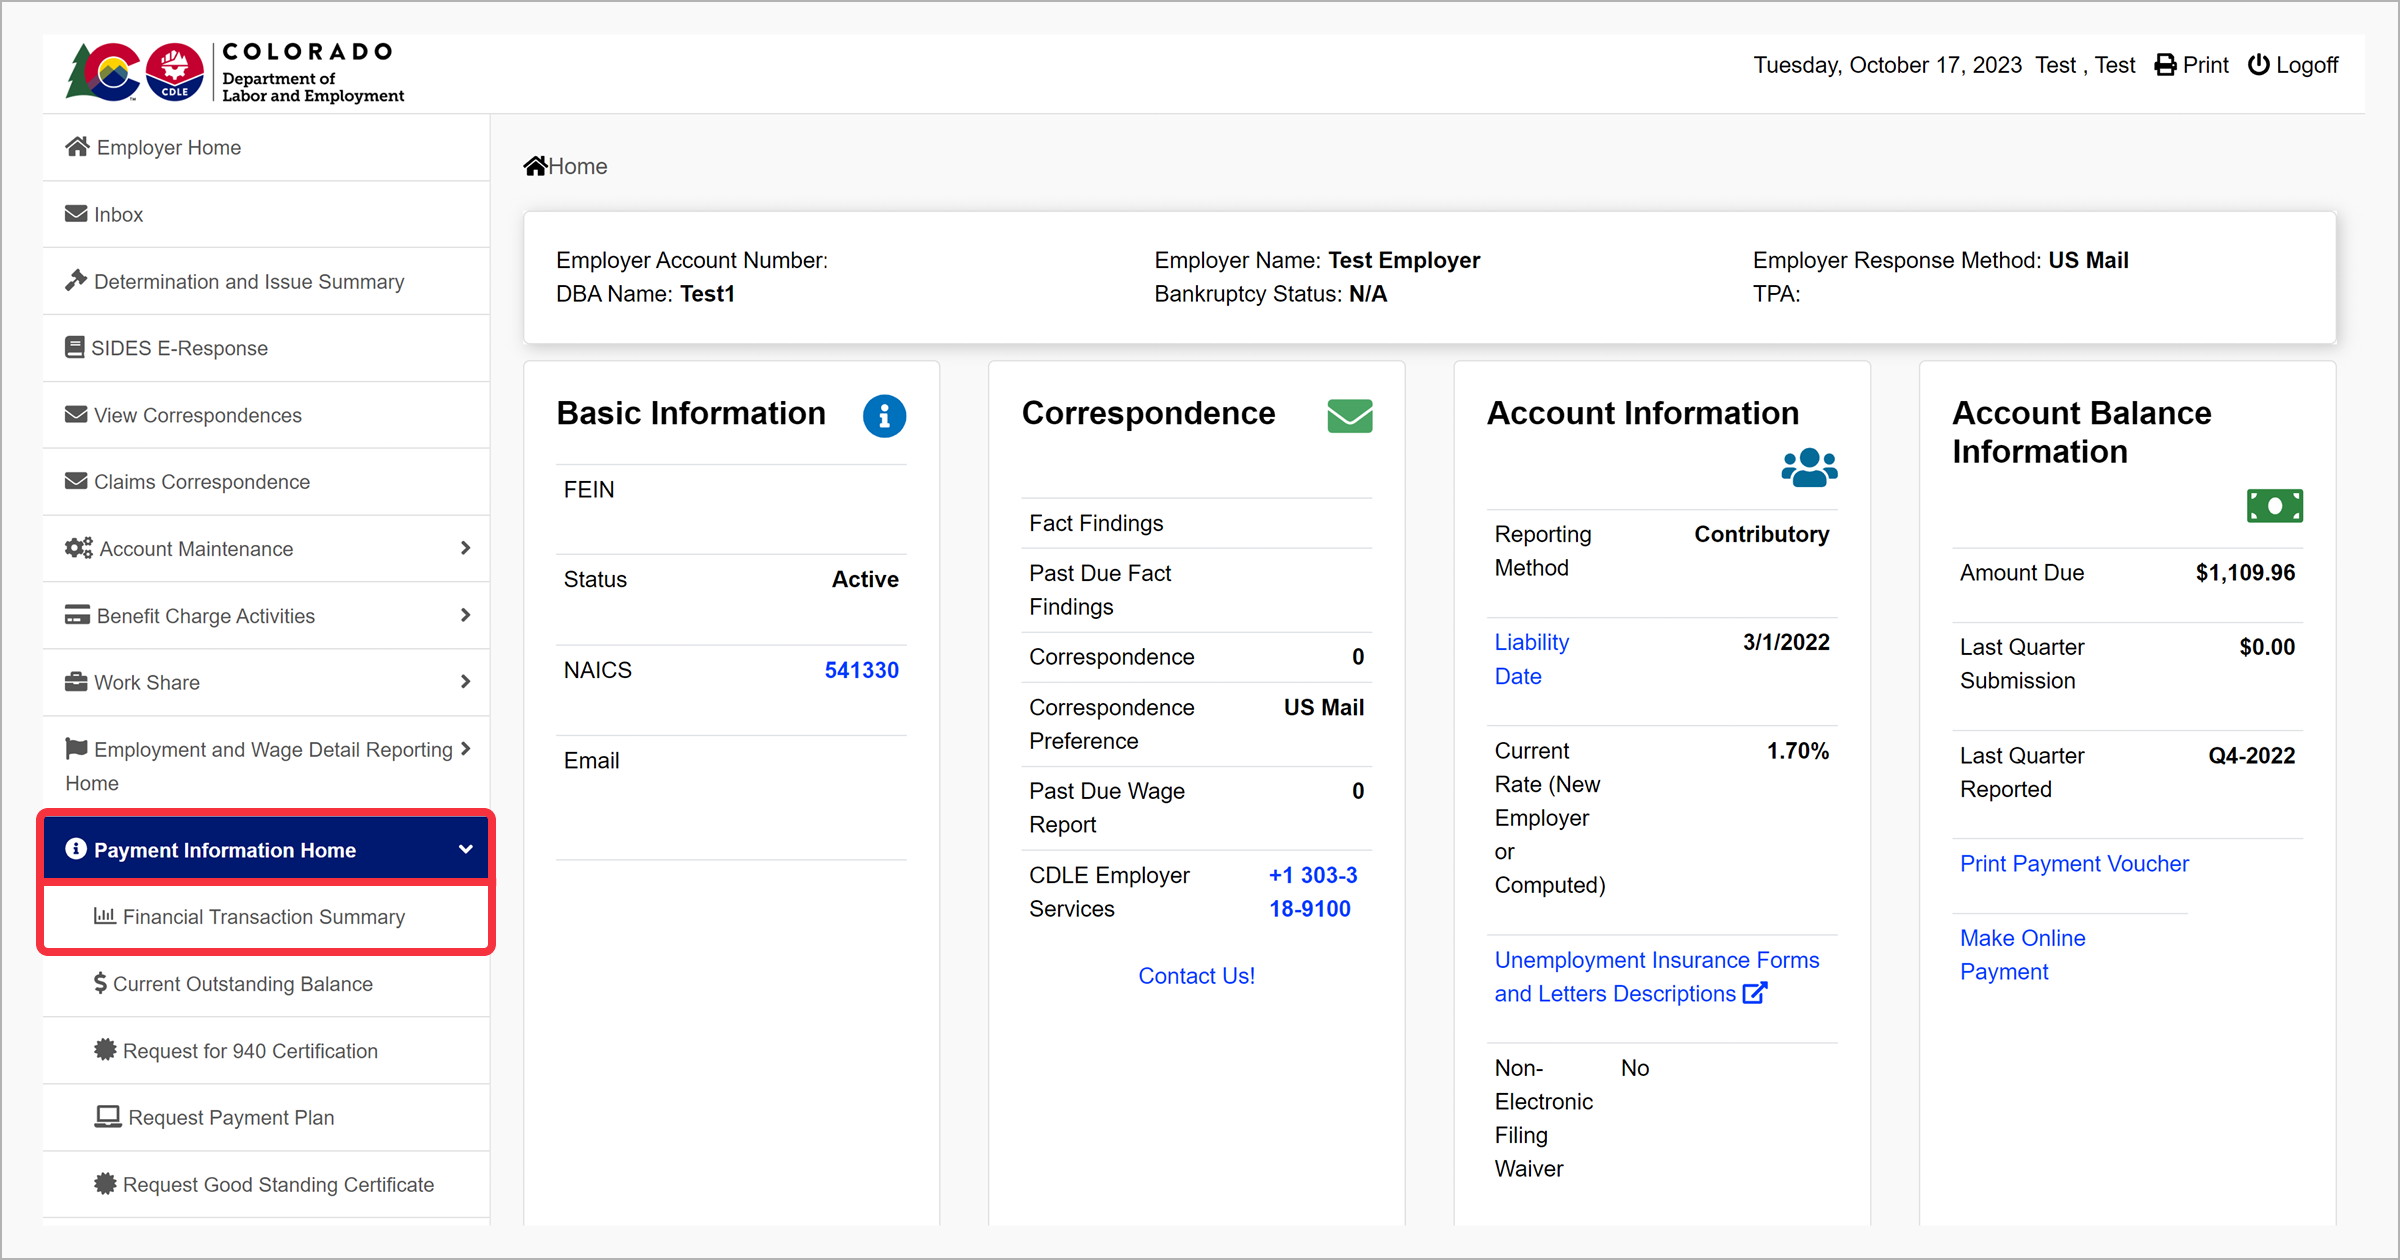
- Click the “Financial Transaction Summary” subtab.
Note: You can also access the payment screens by clicking the “Make Online Payment” link under the Account Balance Information section of the Employer Home page. If there is no balance on your UI account, the options to make a payment will be hidden.
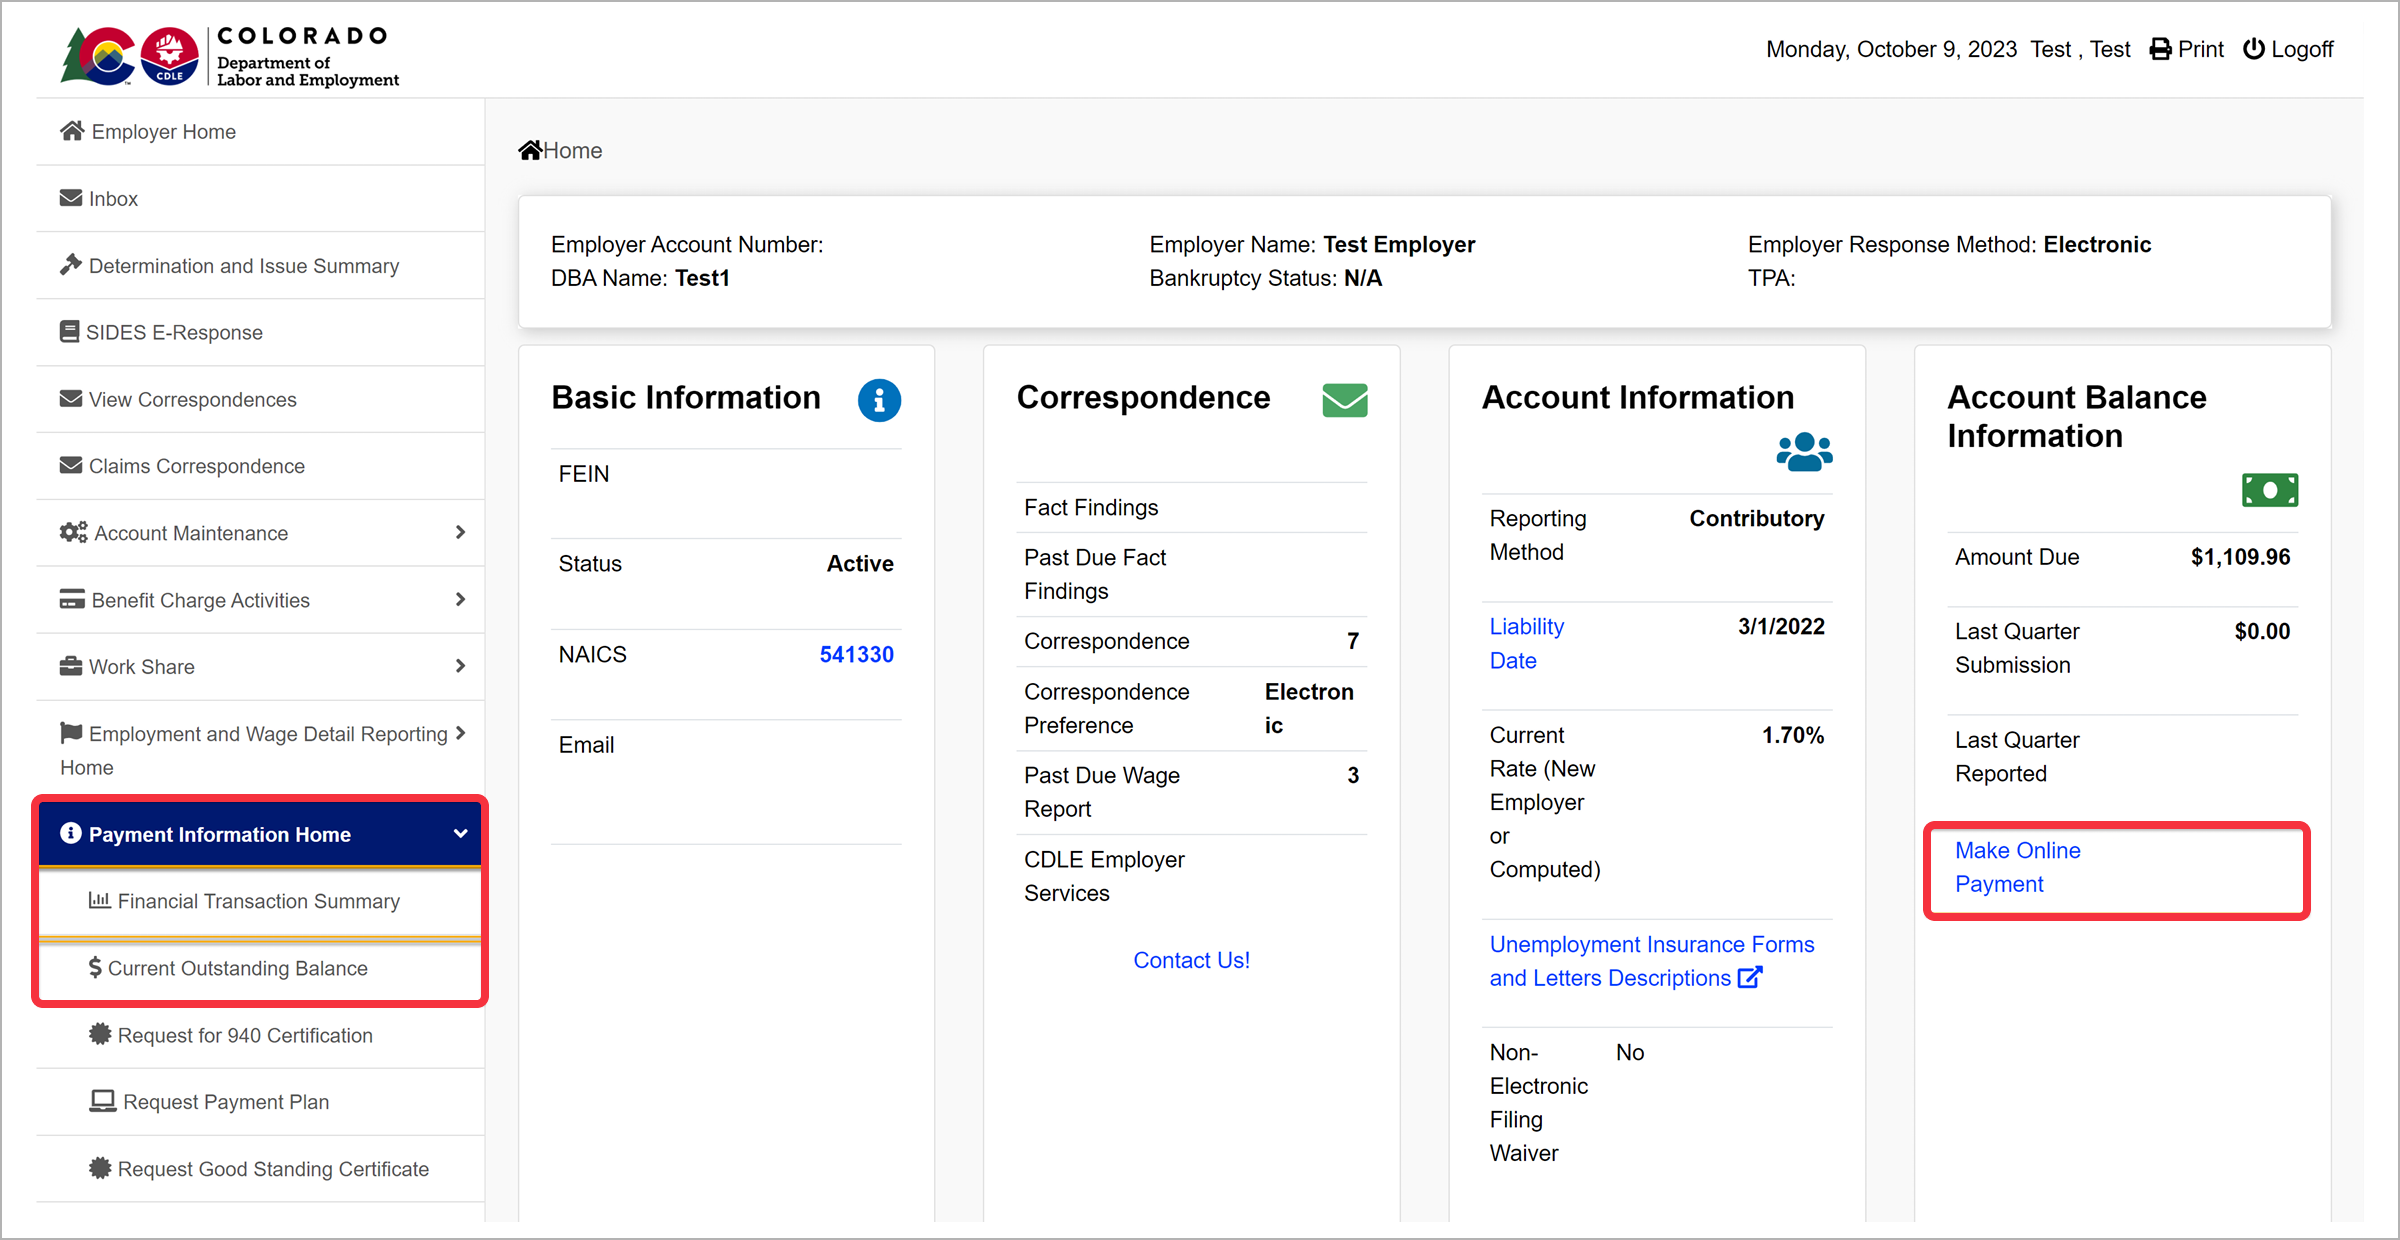
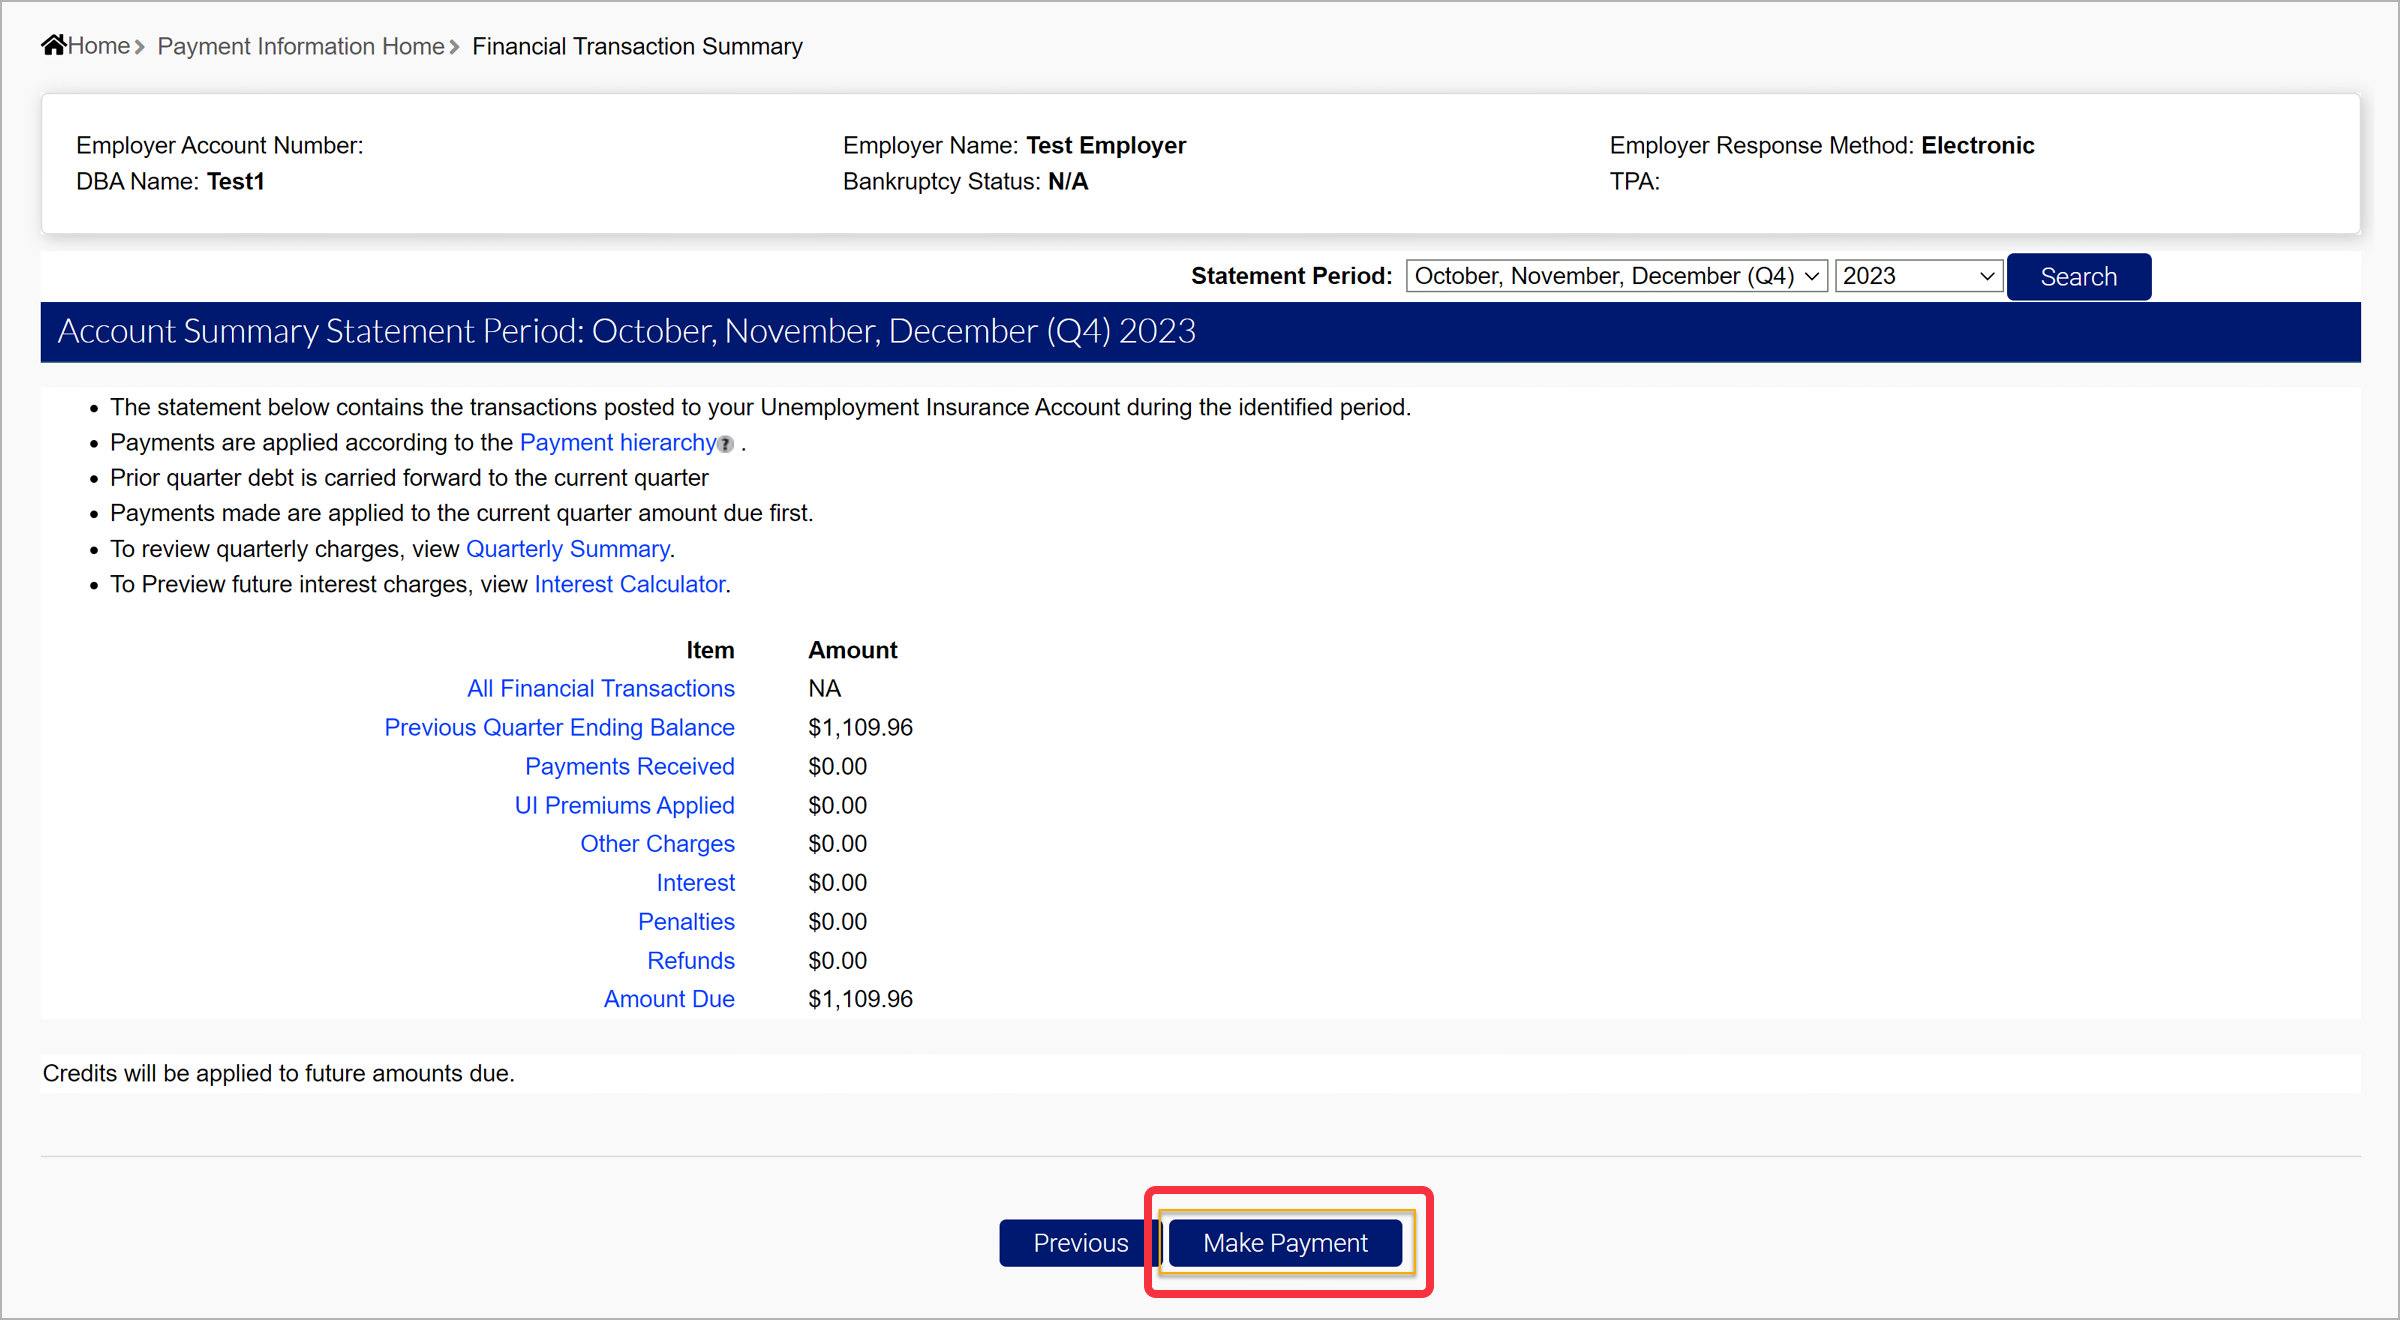
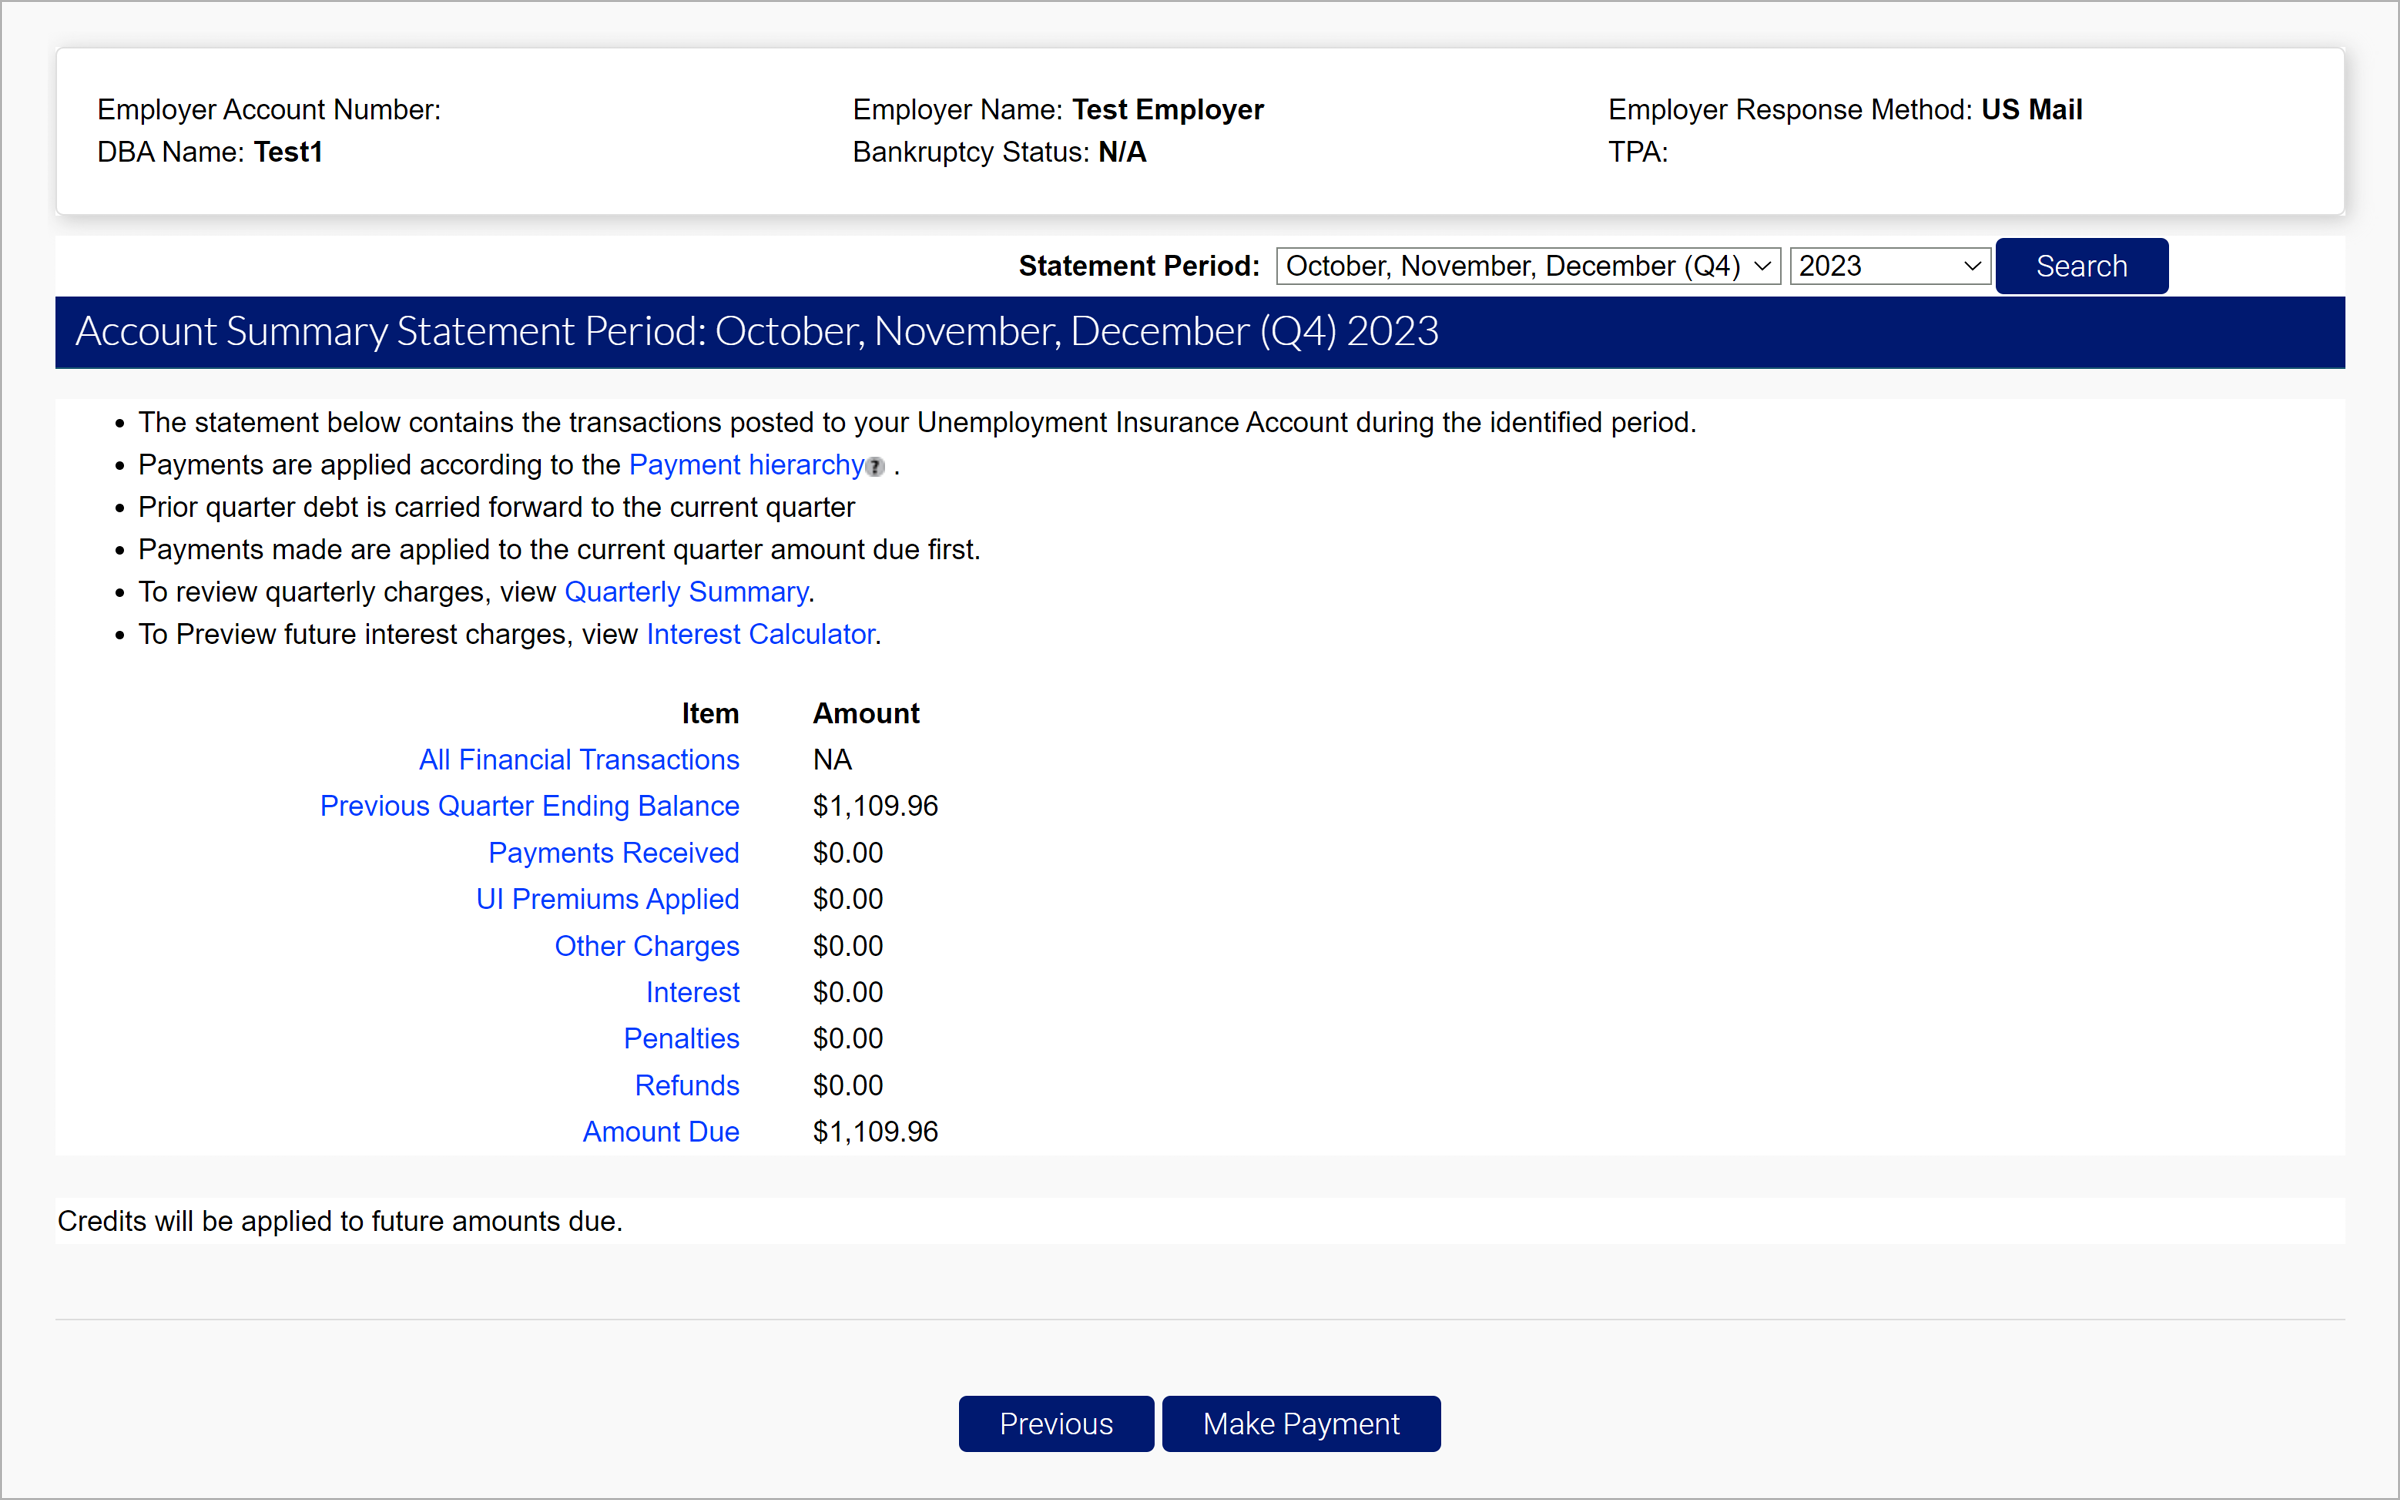
Step 2. Review Your Balances
The Financial Transaction Summary screen provides a breakdown of all previous and upcoming payments. The blue hyperlinks on the Financial Transaction Summary screen will redirect you to various payment information pages.
- Search the statement period using the dropdown and search function provided.
- Click “Make Payment” to continue.
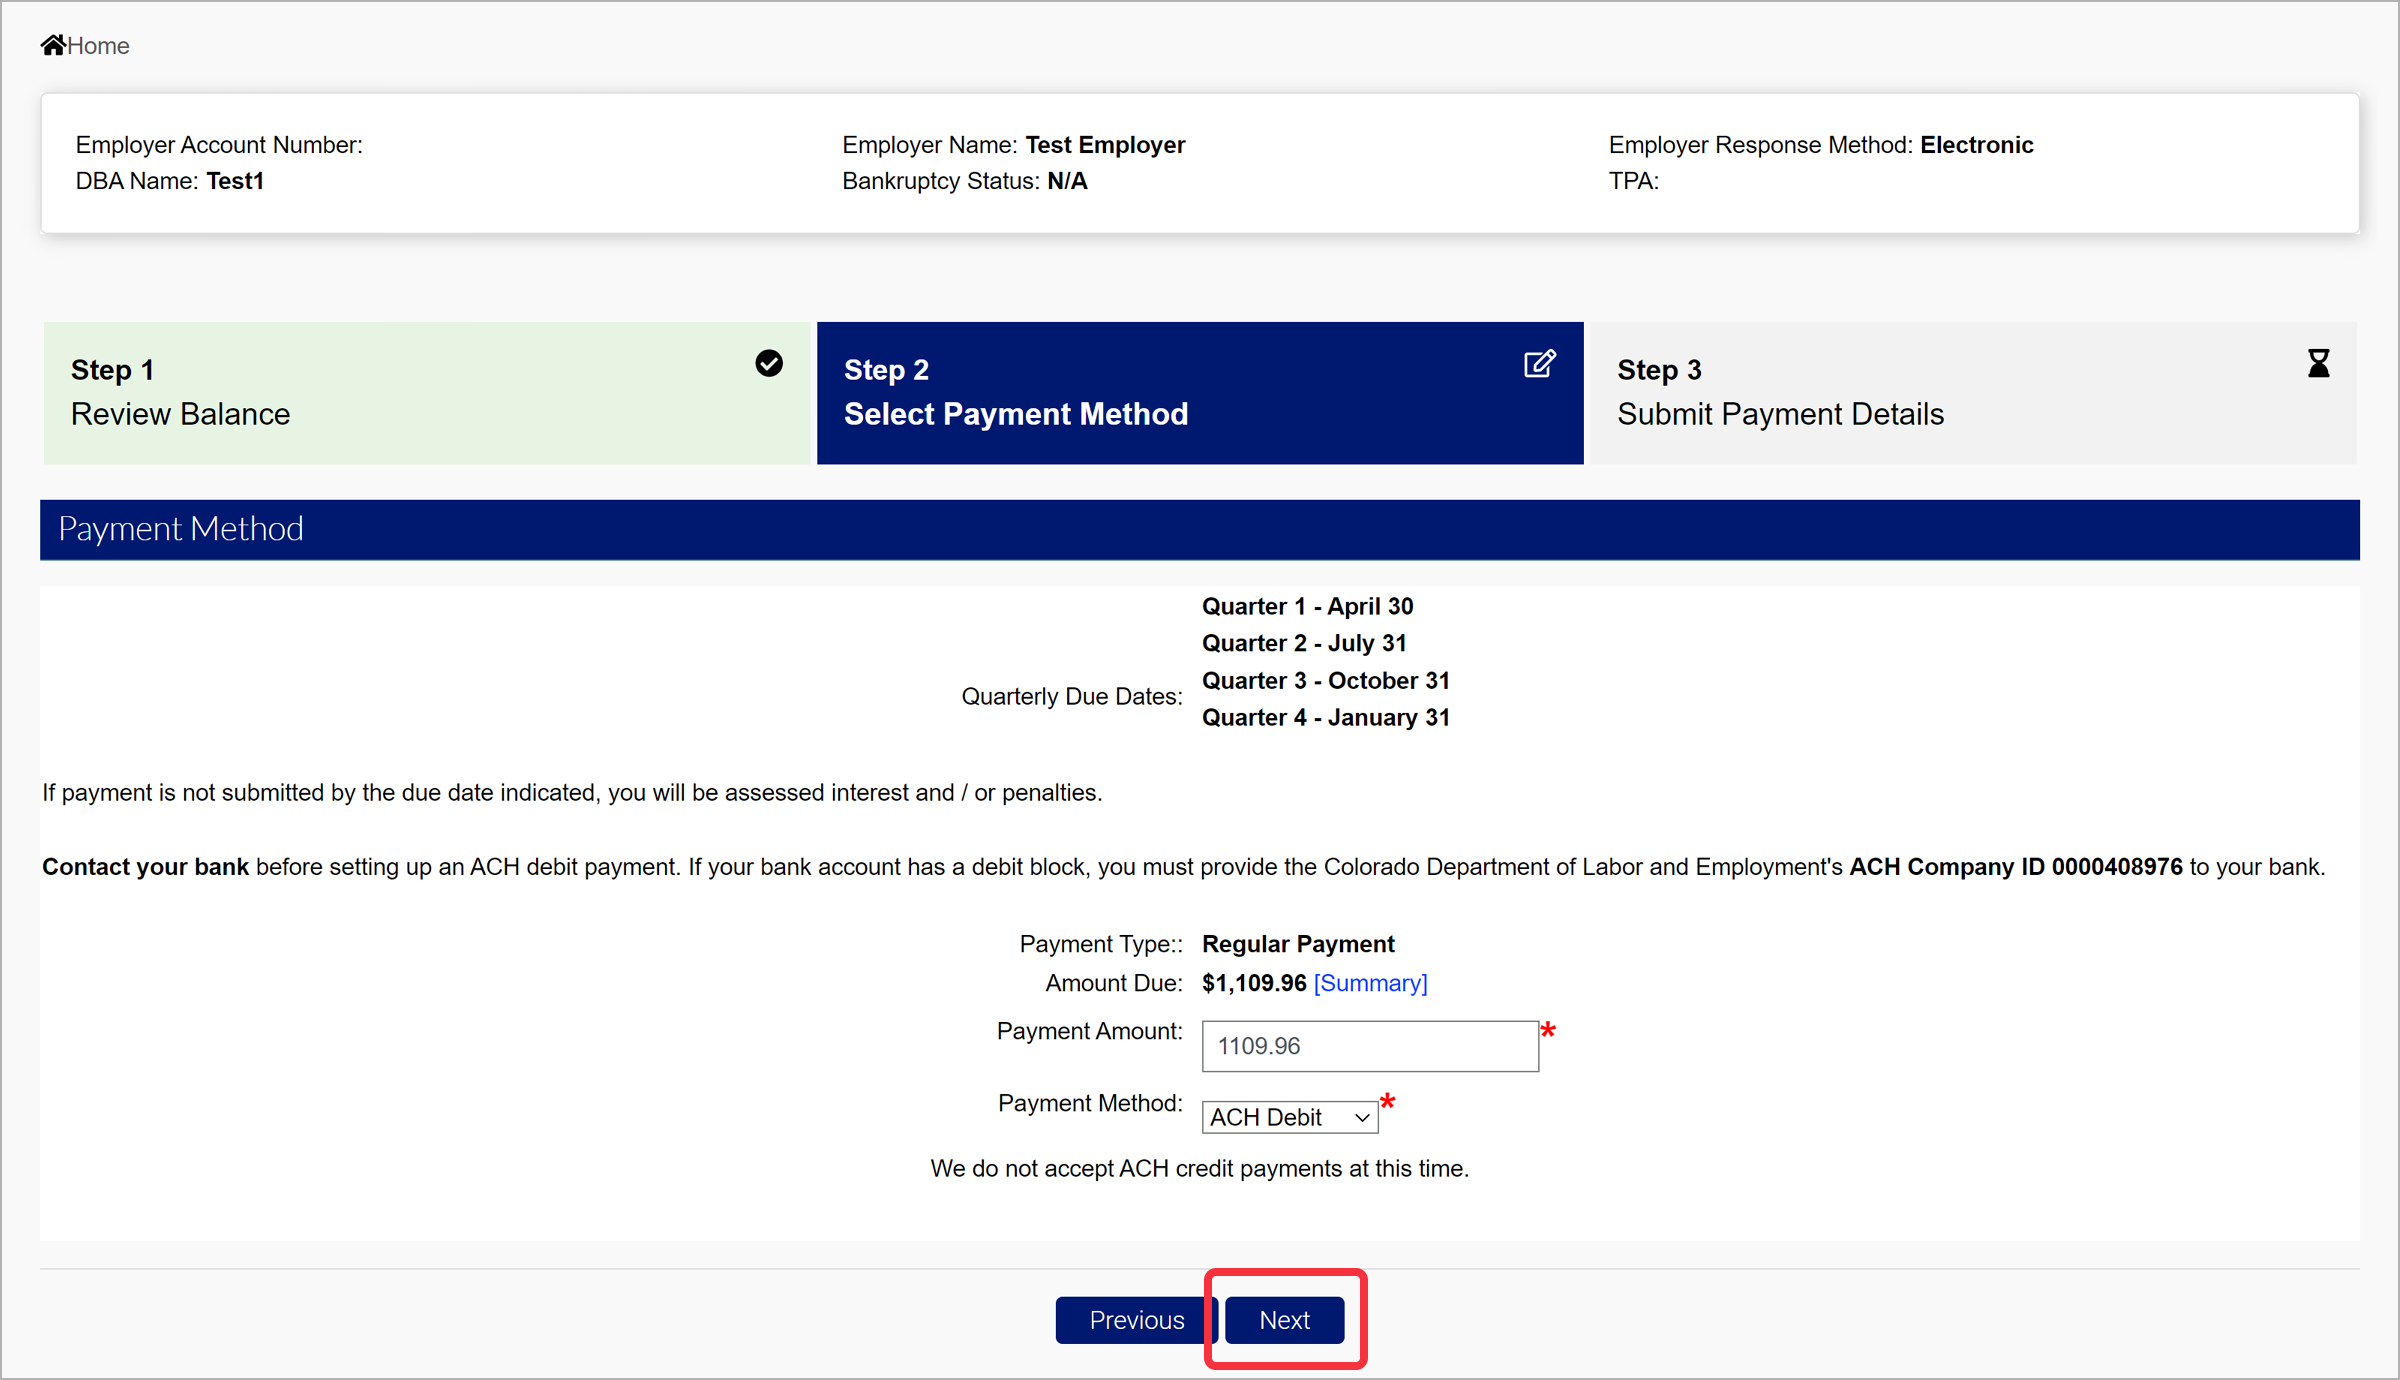
Step 3. Select A Payment Method
- Enter the required payment amount in the field provided.
- Select the “ACH Debit” option from the dropdown provided.
Note: The ACH Debit option will require you to enter your bank account information. If your bank account has a debit block, you will need to provide CDLE’s ACH Company ID to your bank. Contact your bank before setting up the ACH debit payment.
- Click “Next”.
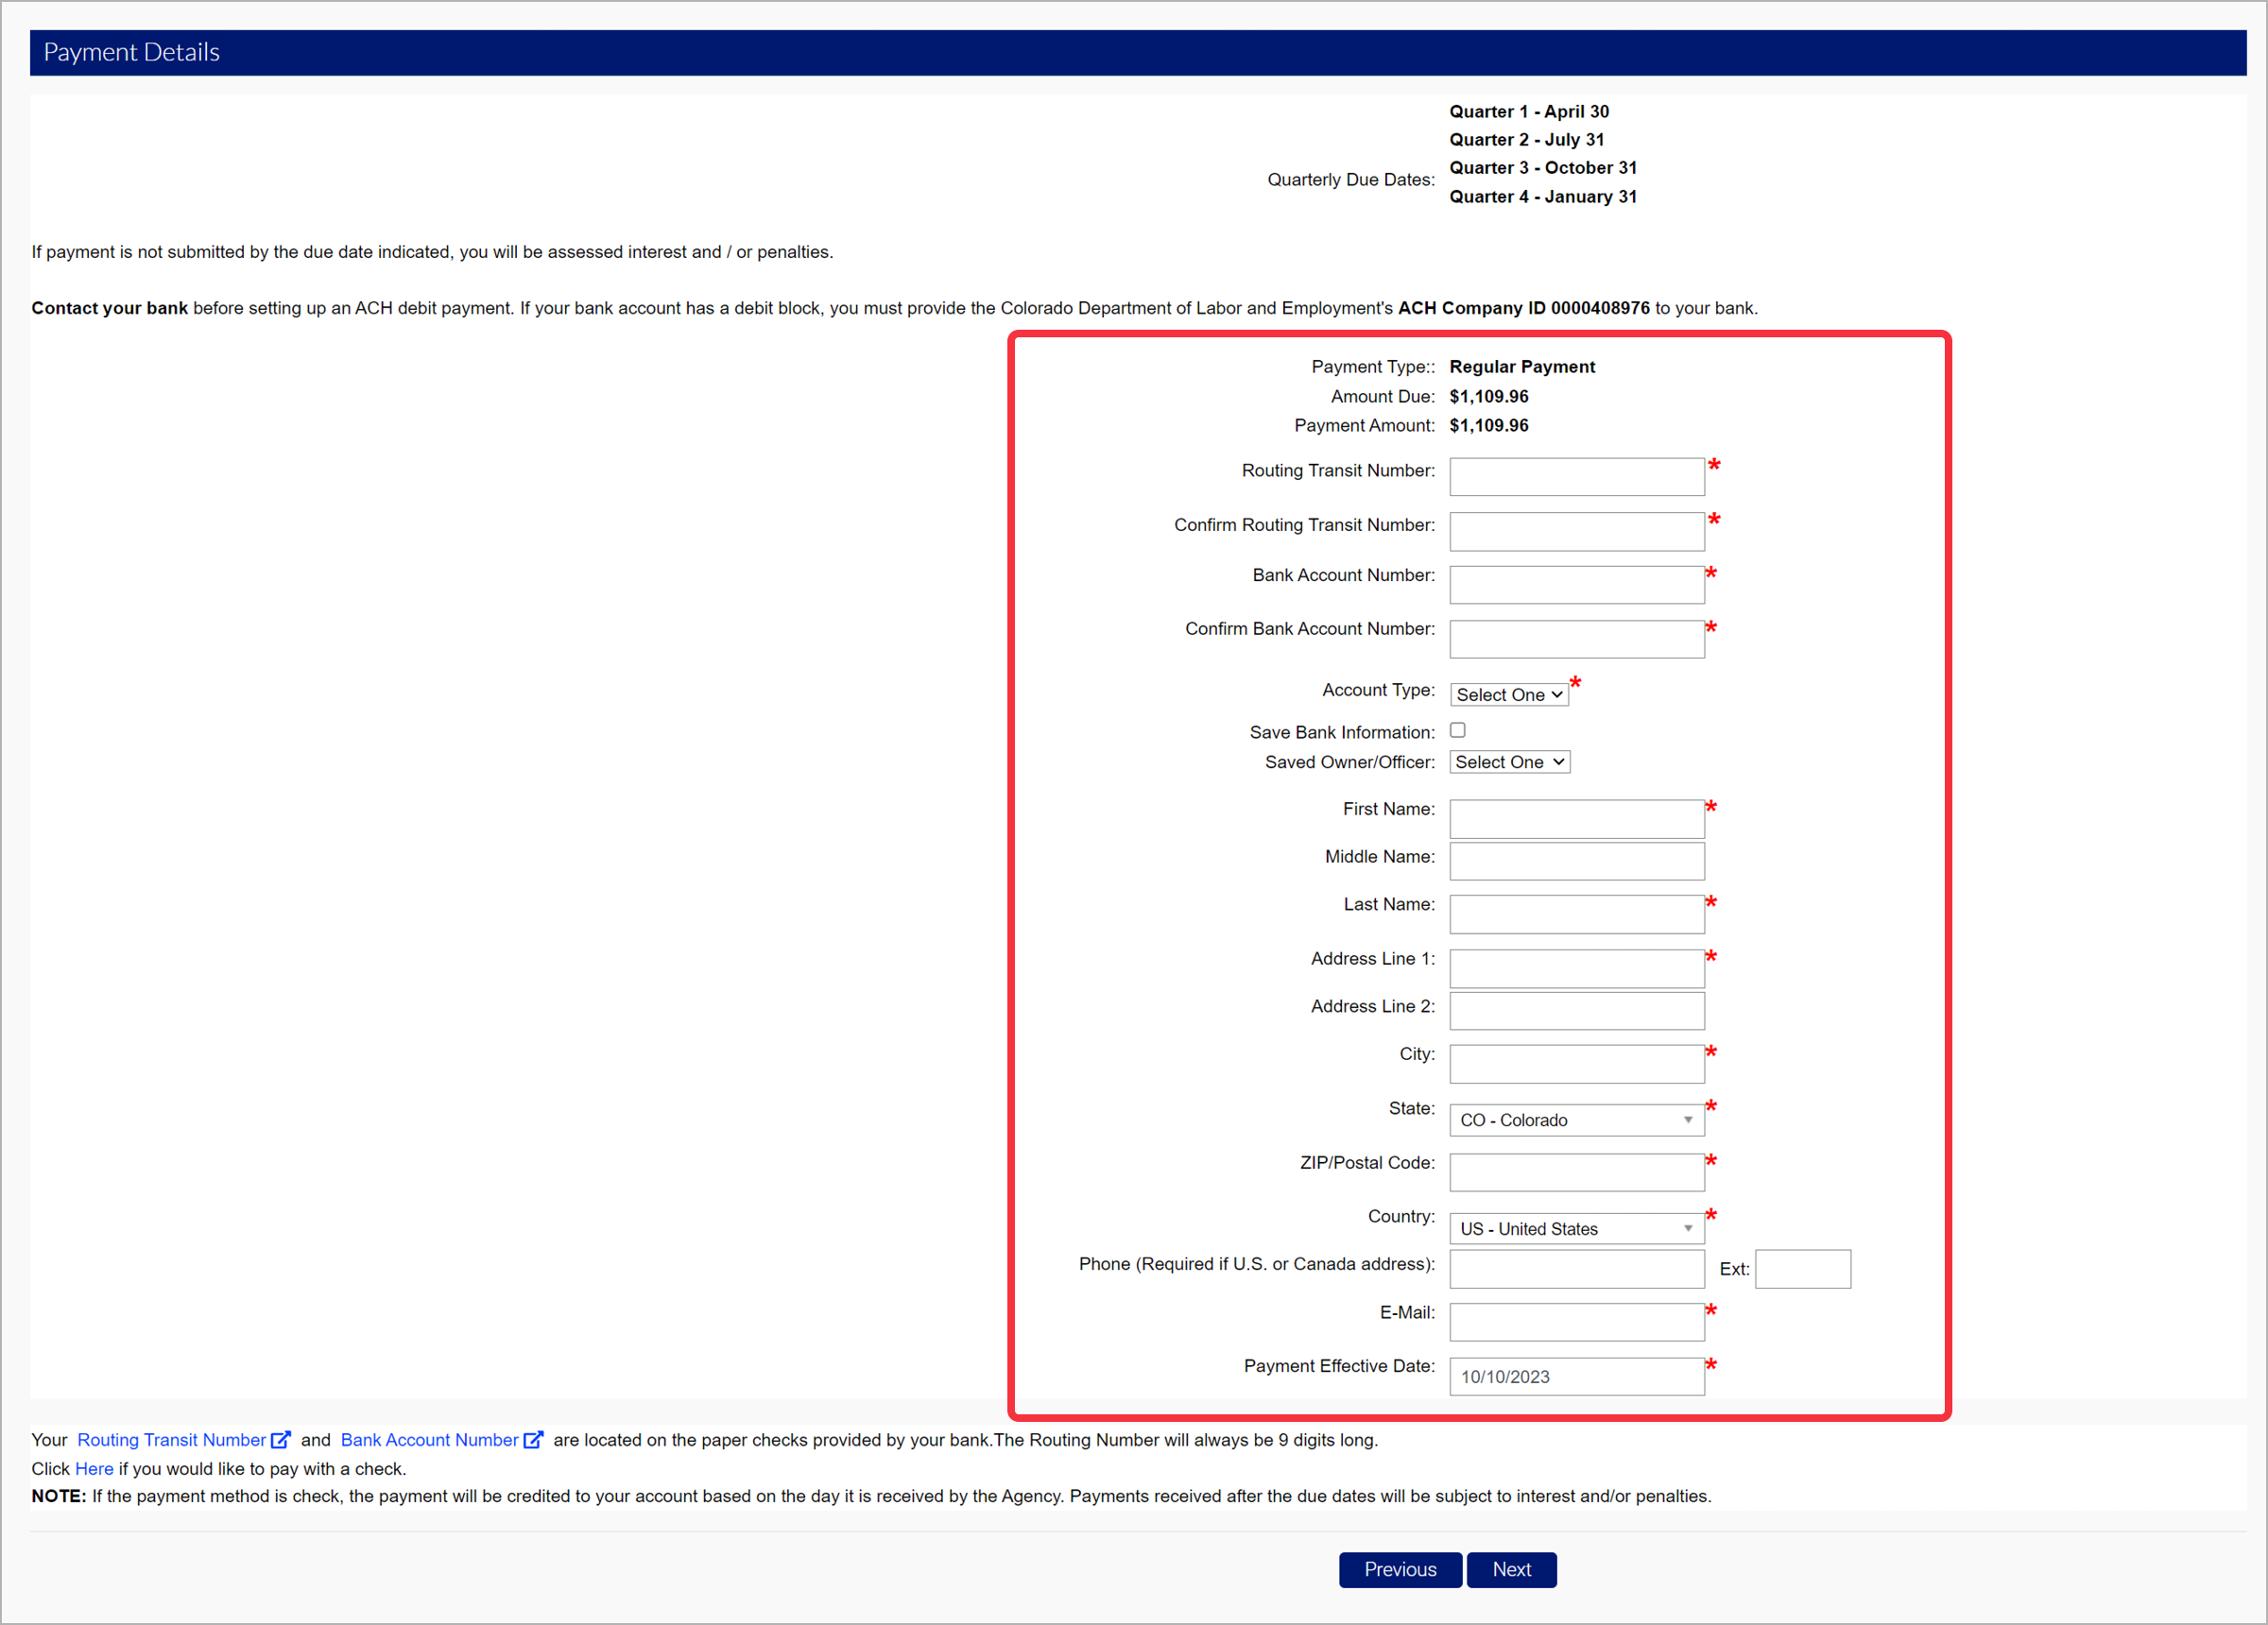
Step 4. Enter Payment Information
- Enter the required payment information in the fields provided.
- Select the “Save Bank Information” checkbox to save your banking information for future payments.
- Click “Next”.
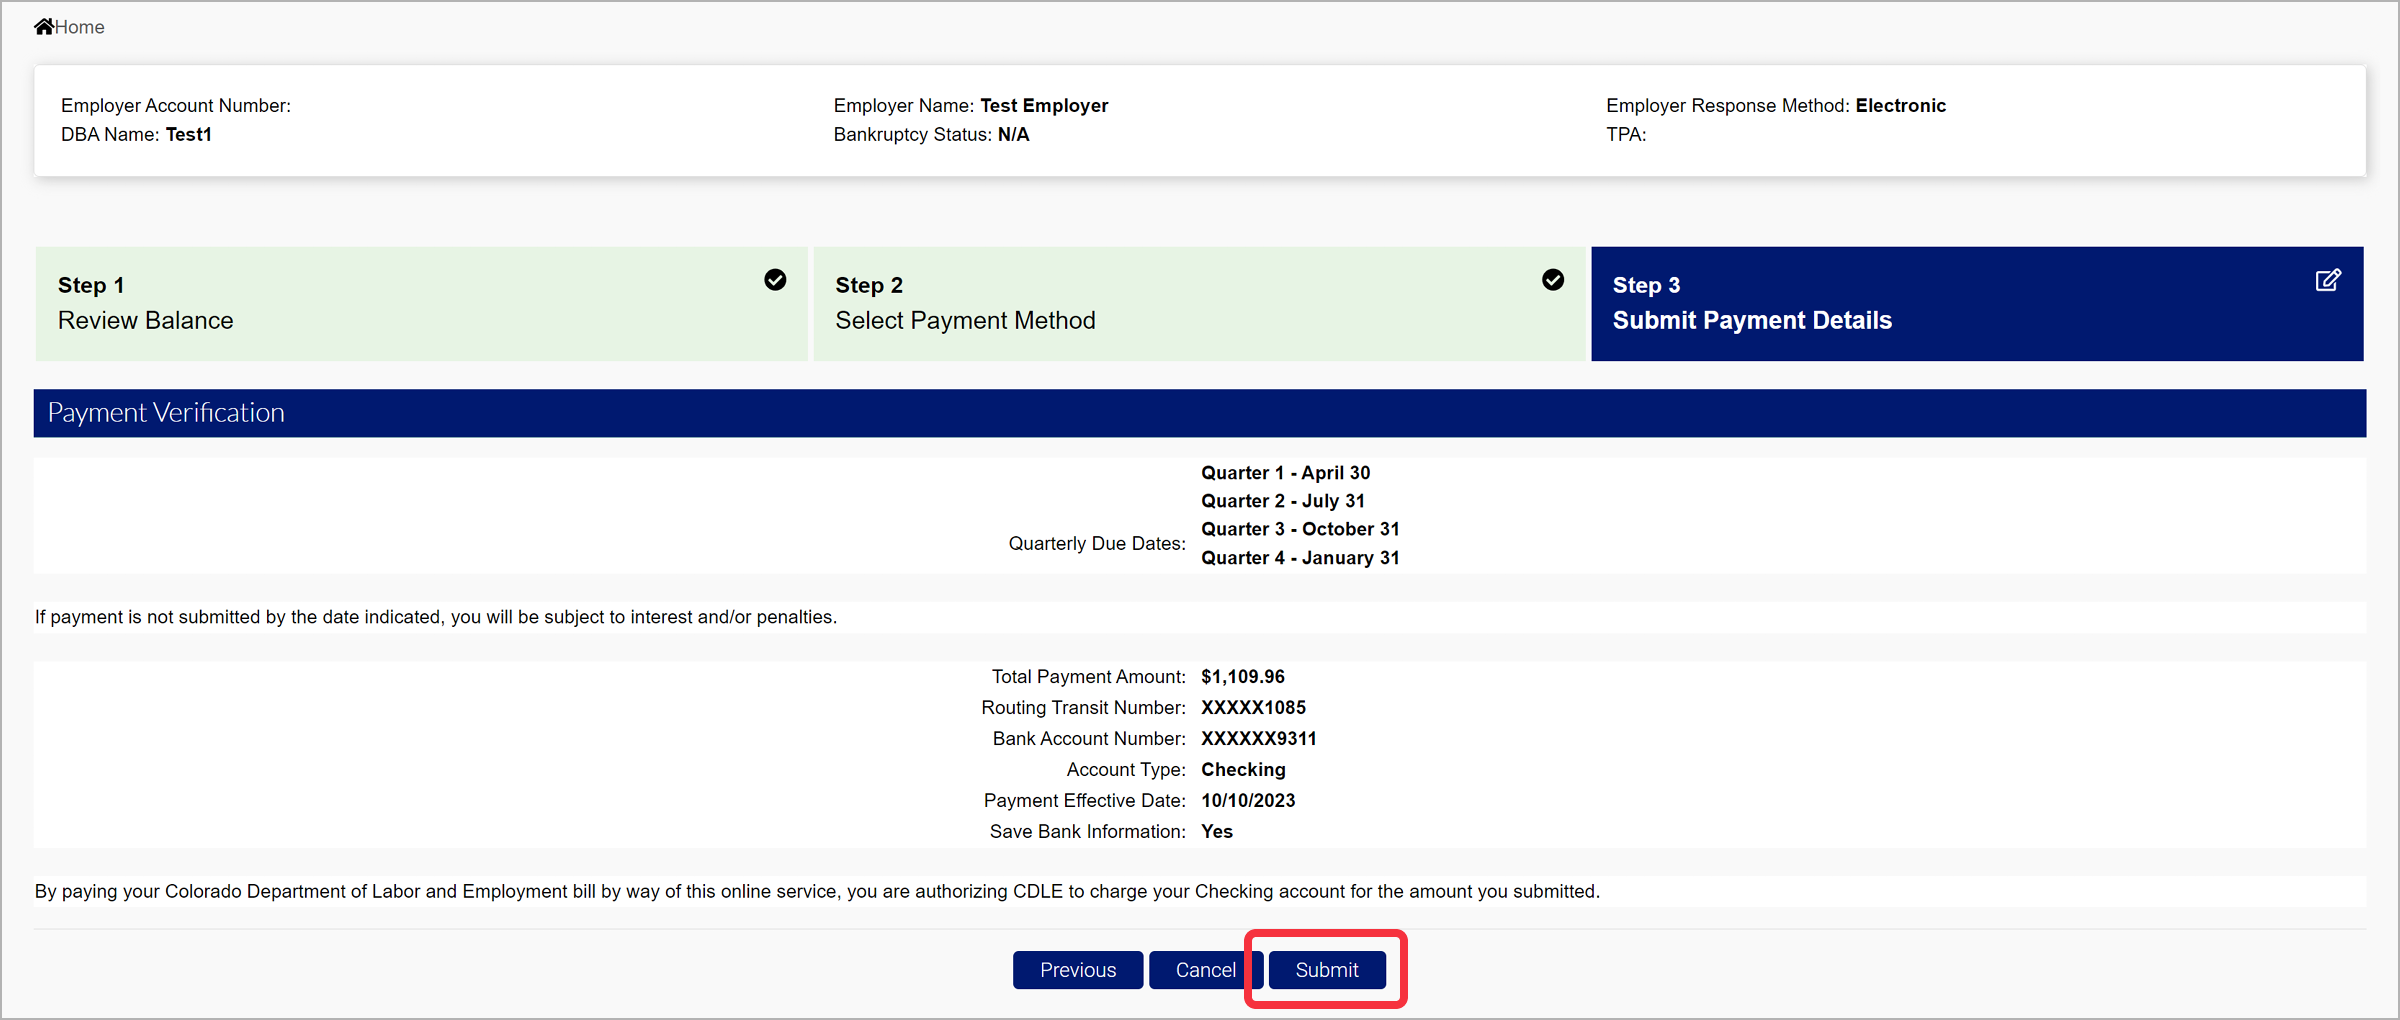
Step 5. Submit Your Payment
- Review information in the Payment Verification screen.
- Click “Submit” to submit your payment.
The Payment Confirmation Screen will provide a payment confirmation number, and more information.
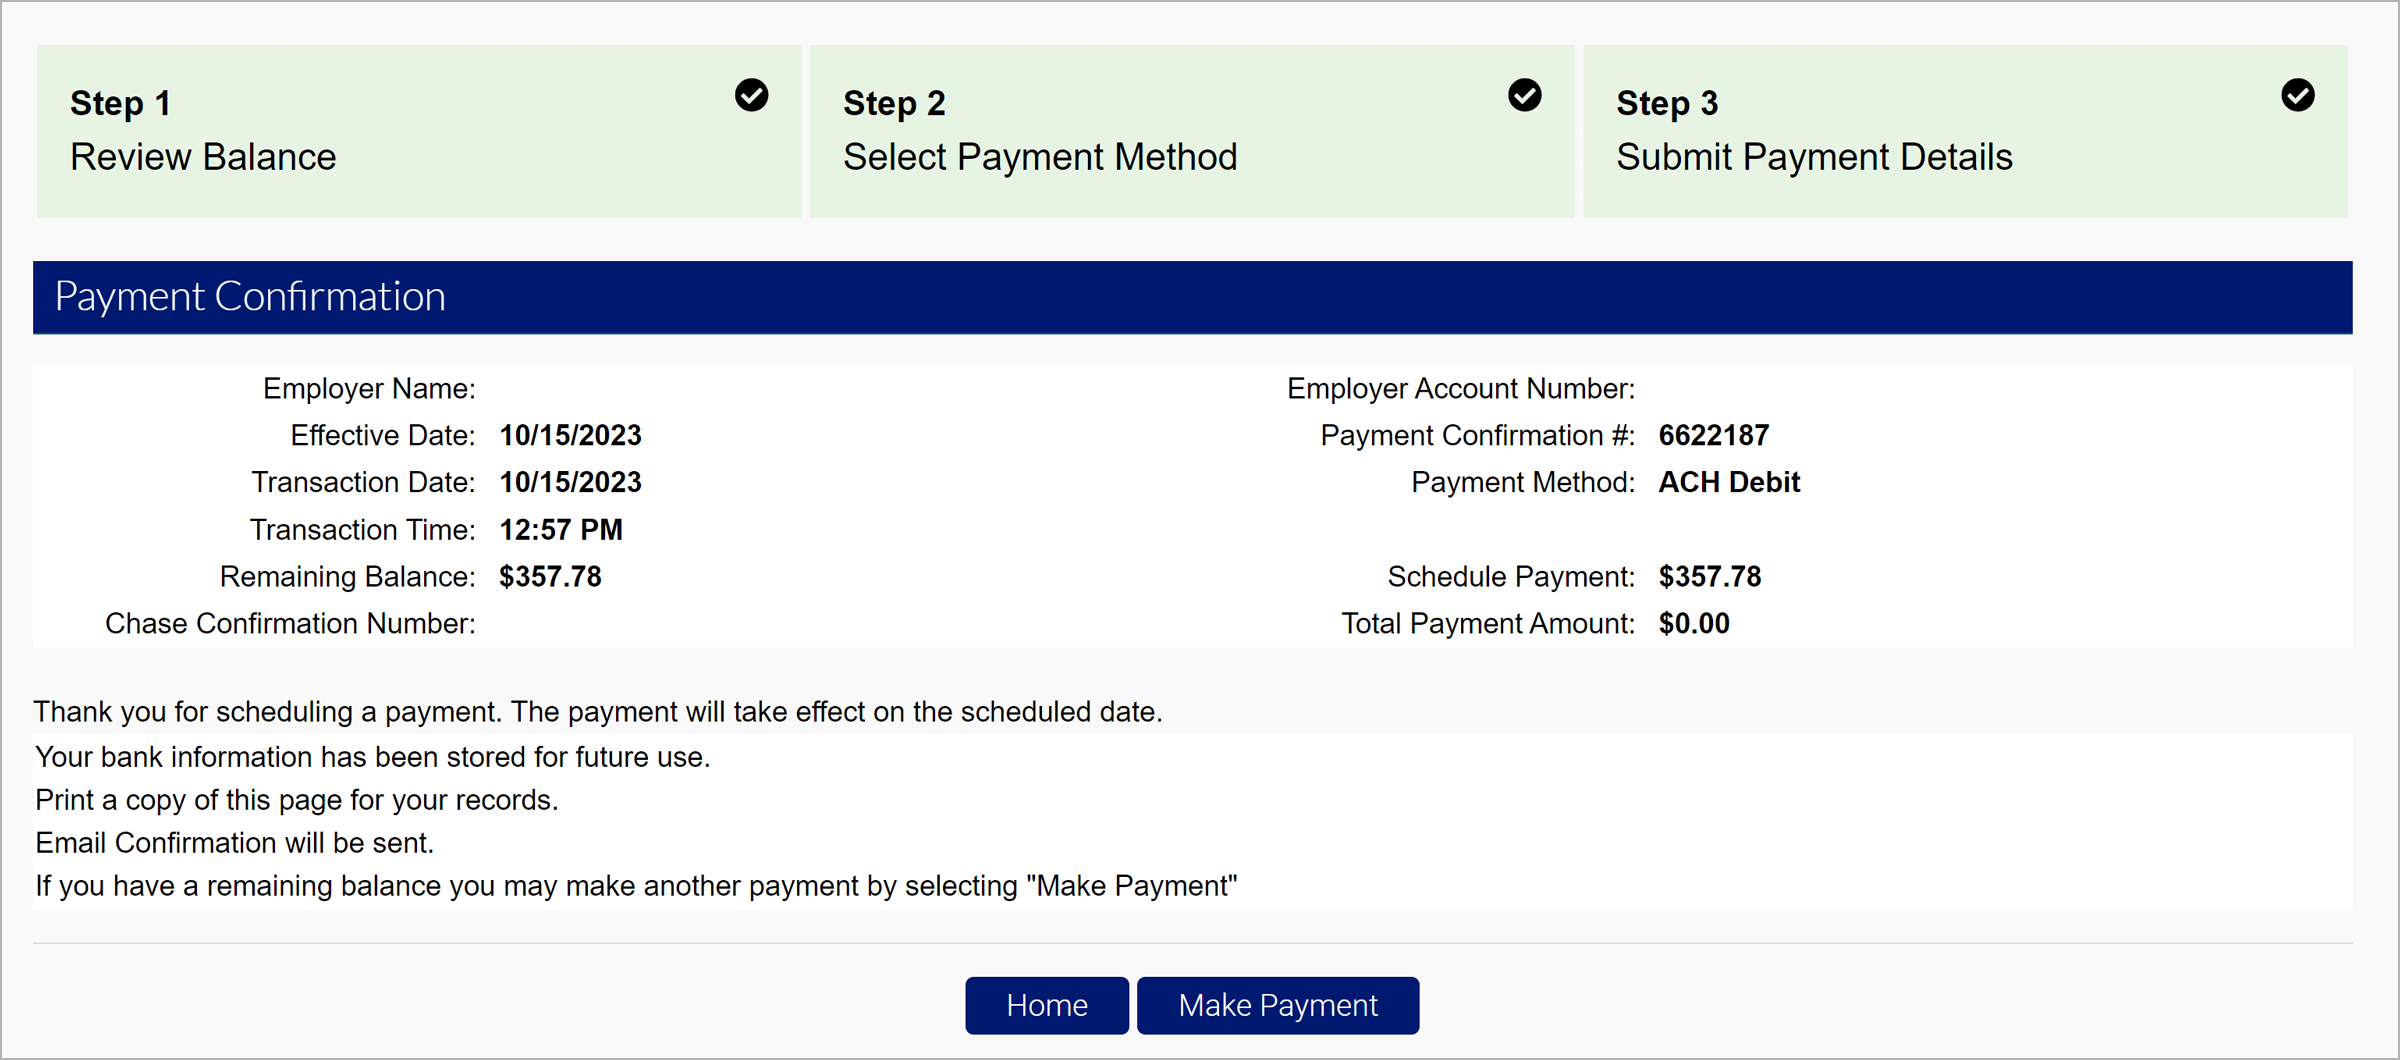
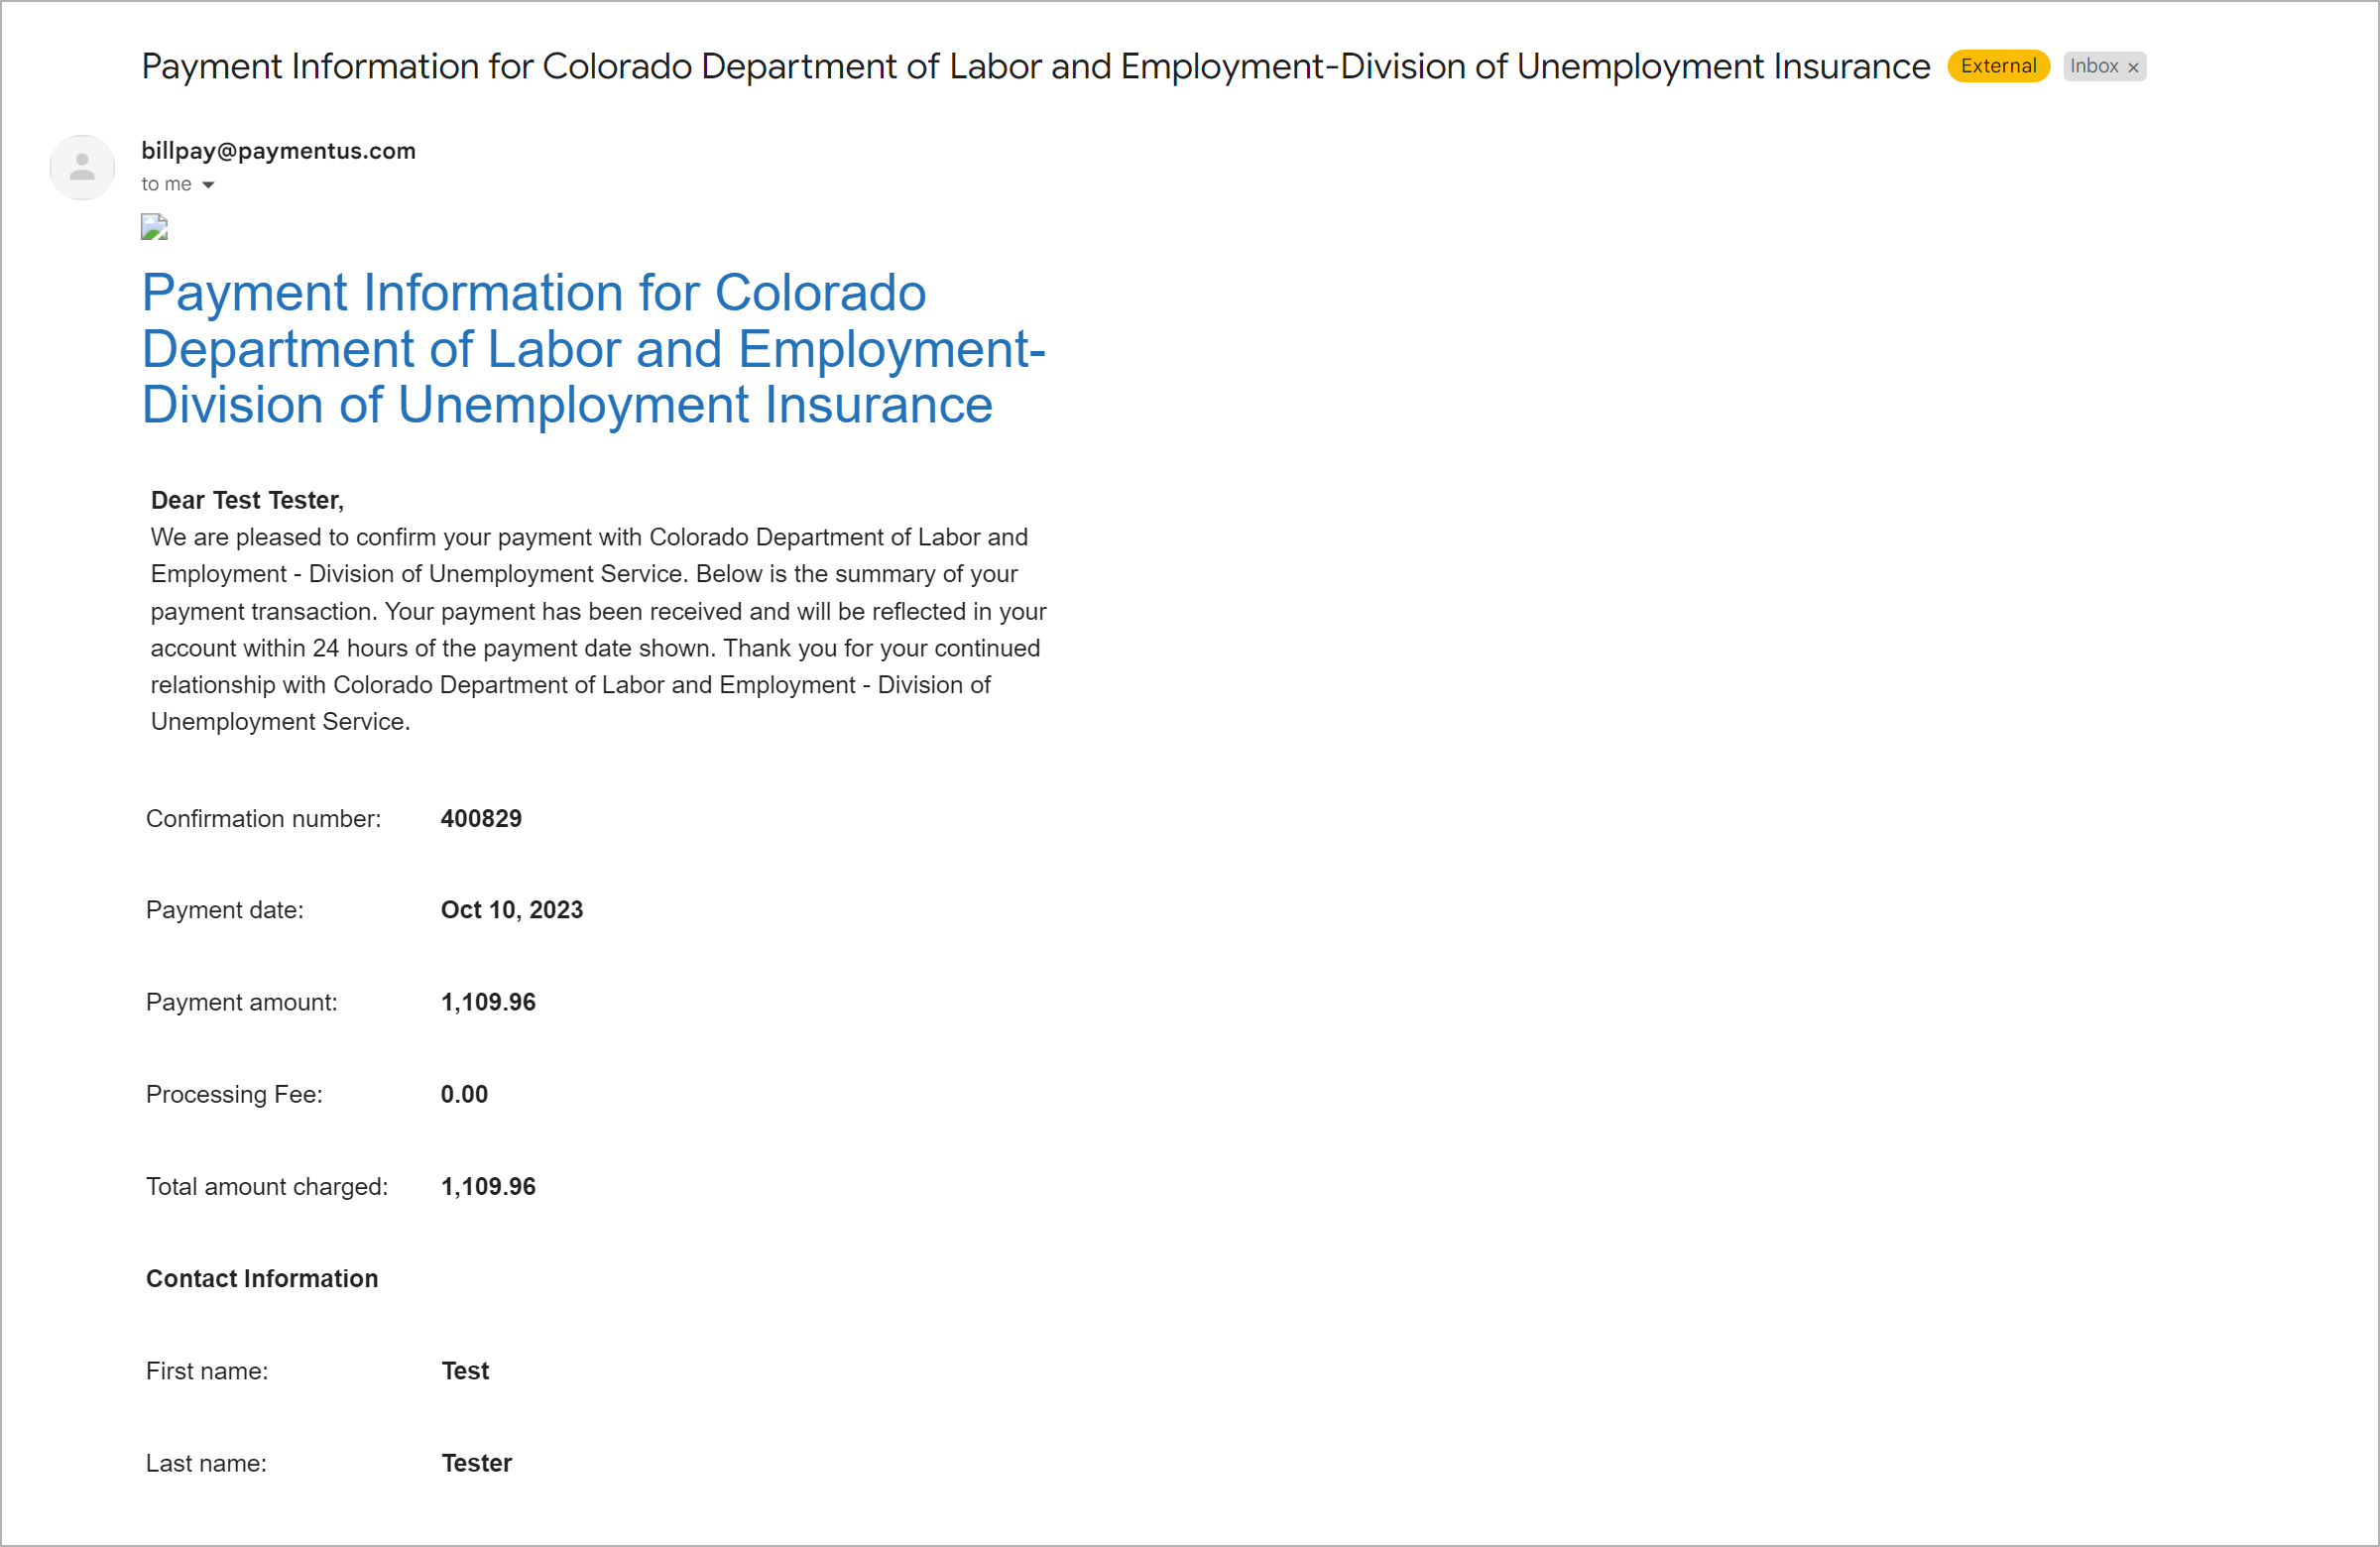
You will receive a confirmation email related to your payment when it is processed.
Note: Scheduled payments will not receive the email notification until the payment has been processed.
How to Make a Paper Check Payment
Paper check payments must be submitted with a printed payment voucher. Paper checks received without a payment voucher will not be processed and returned to sender.
Step 1. Access Payment Screens
- Login to your employer account in MyUI Employer+ to open your Employer Home page.
- Click the “Payment Information Home” tab in the left-hand navigation menu.
- Click the “Financial Transaction Summary” subtab.
Note: You access a printable payment voucher by clicking the “Print Payment Voucher” link under the Account Balance Information section of the Employer Home page. If there is no balance on your UI account, the link will be hidden.
Step 2. Review Your Balances
The Financial Transaction Summary screen provides a breakdown of all previous and upcoming payments. The blue hyperlinks on the Financial Transaction Summary screen will redirect you to various payment information pages.
- Search the statement period using the dropdown and search function provided.
- Click “Make Payment” to continue.
Step 3. Select A Payment Method
- Enter the required payment amount in the field provided.
- Select the “Paper Check” payment option from the dropdown provided.
- Click “Next”.
- Review the information provided in the Paper Check Payment screen.
- Click “Print”.
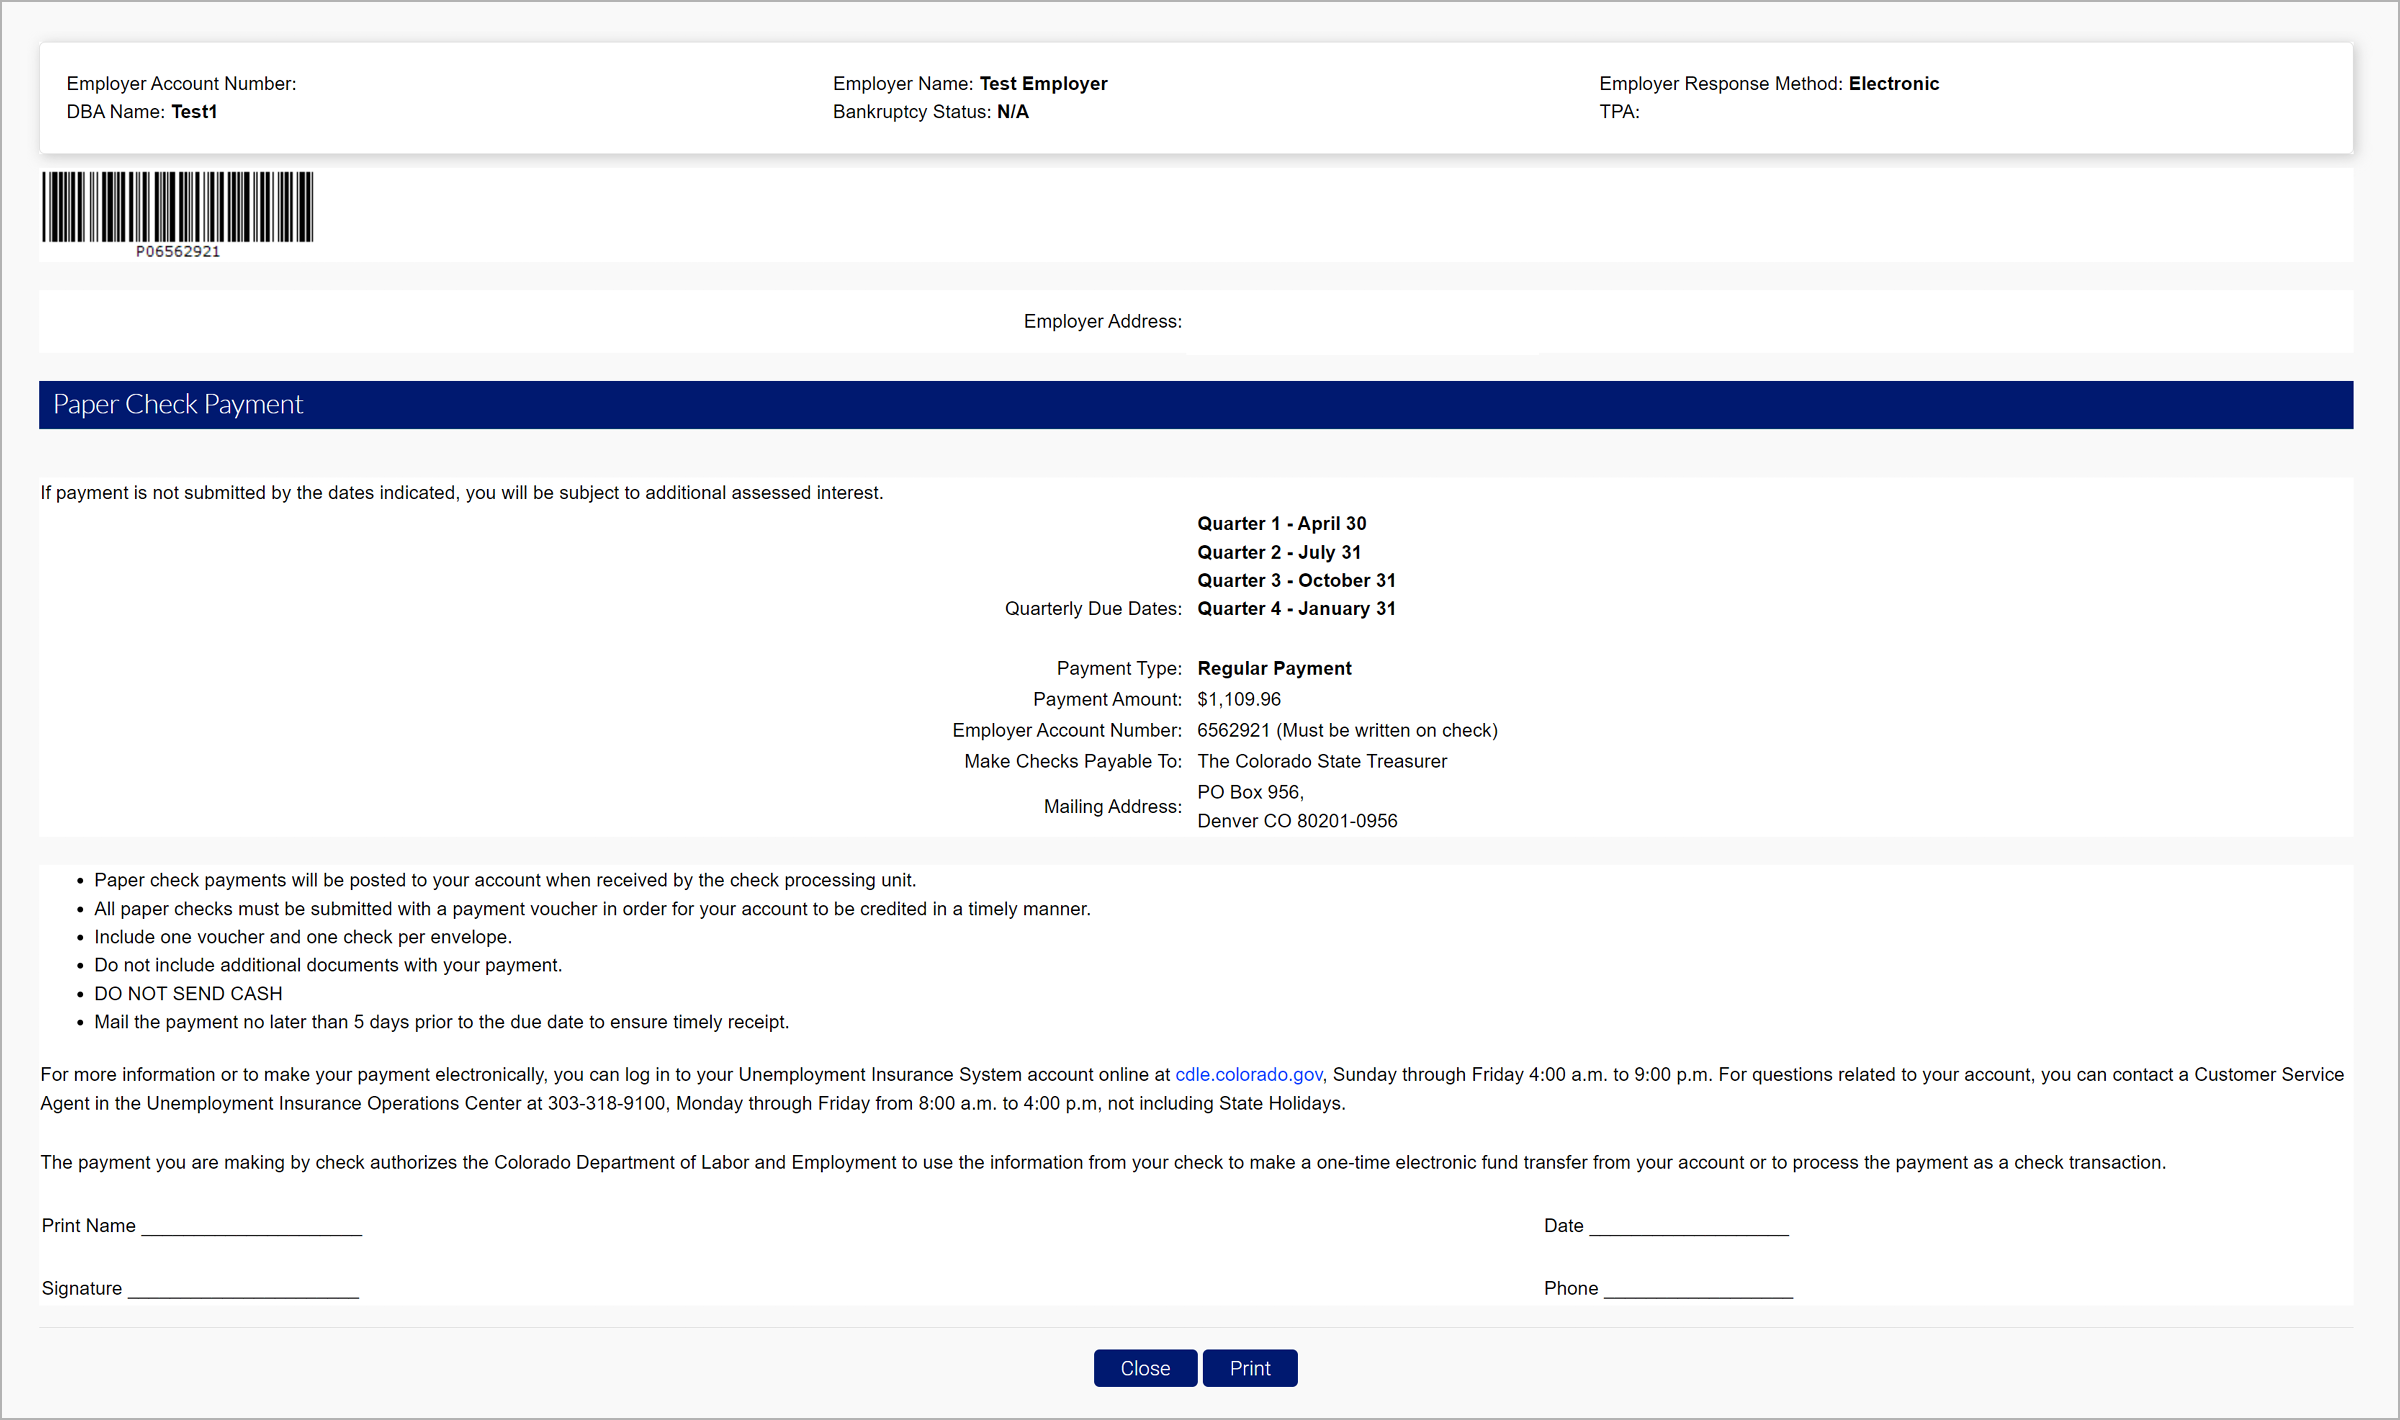
Step 4. Mail Your Payment
Paper check payments should be mailed no later than five days prior to the due date to ensure timely receipt.
- Mail the paper check AND payment voucher in a sealed envelope to:
- Colorado Department of Labor and Employment
PO Box 956, Denver CO 80201-0956
- Colorado Department of Labor and Employment
Check payments will be posted to your account and viewable in the Financial Transaction Summary screen once received and processed.
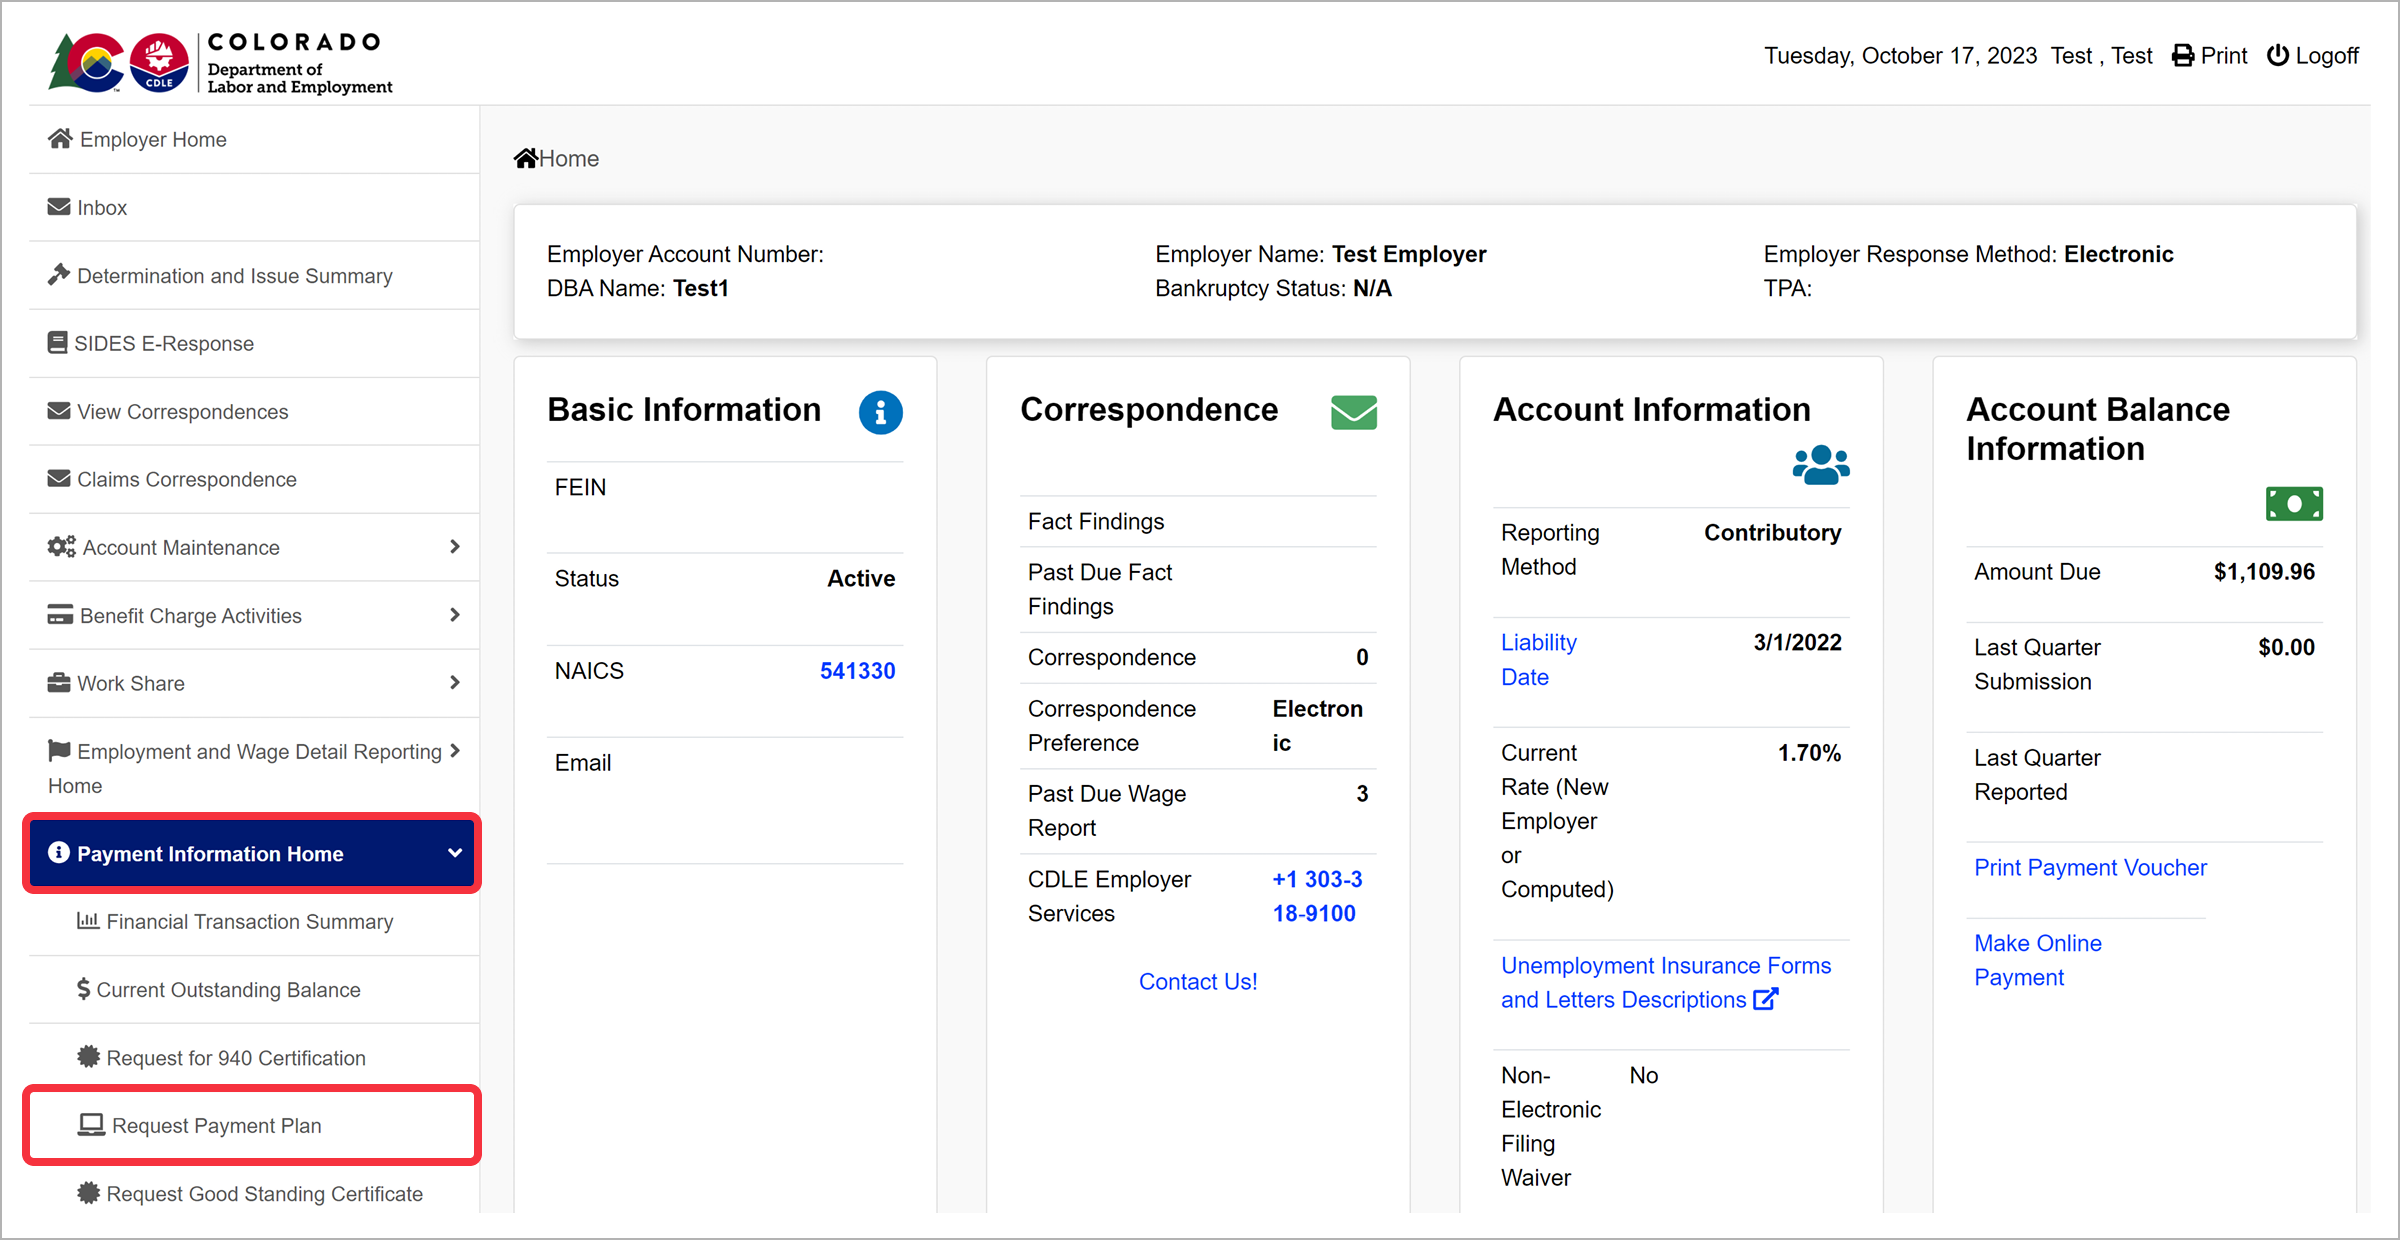
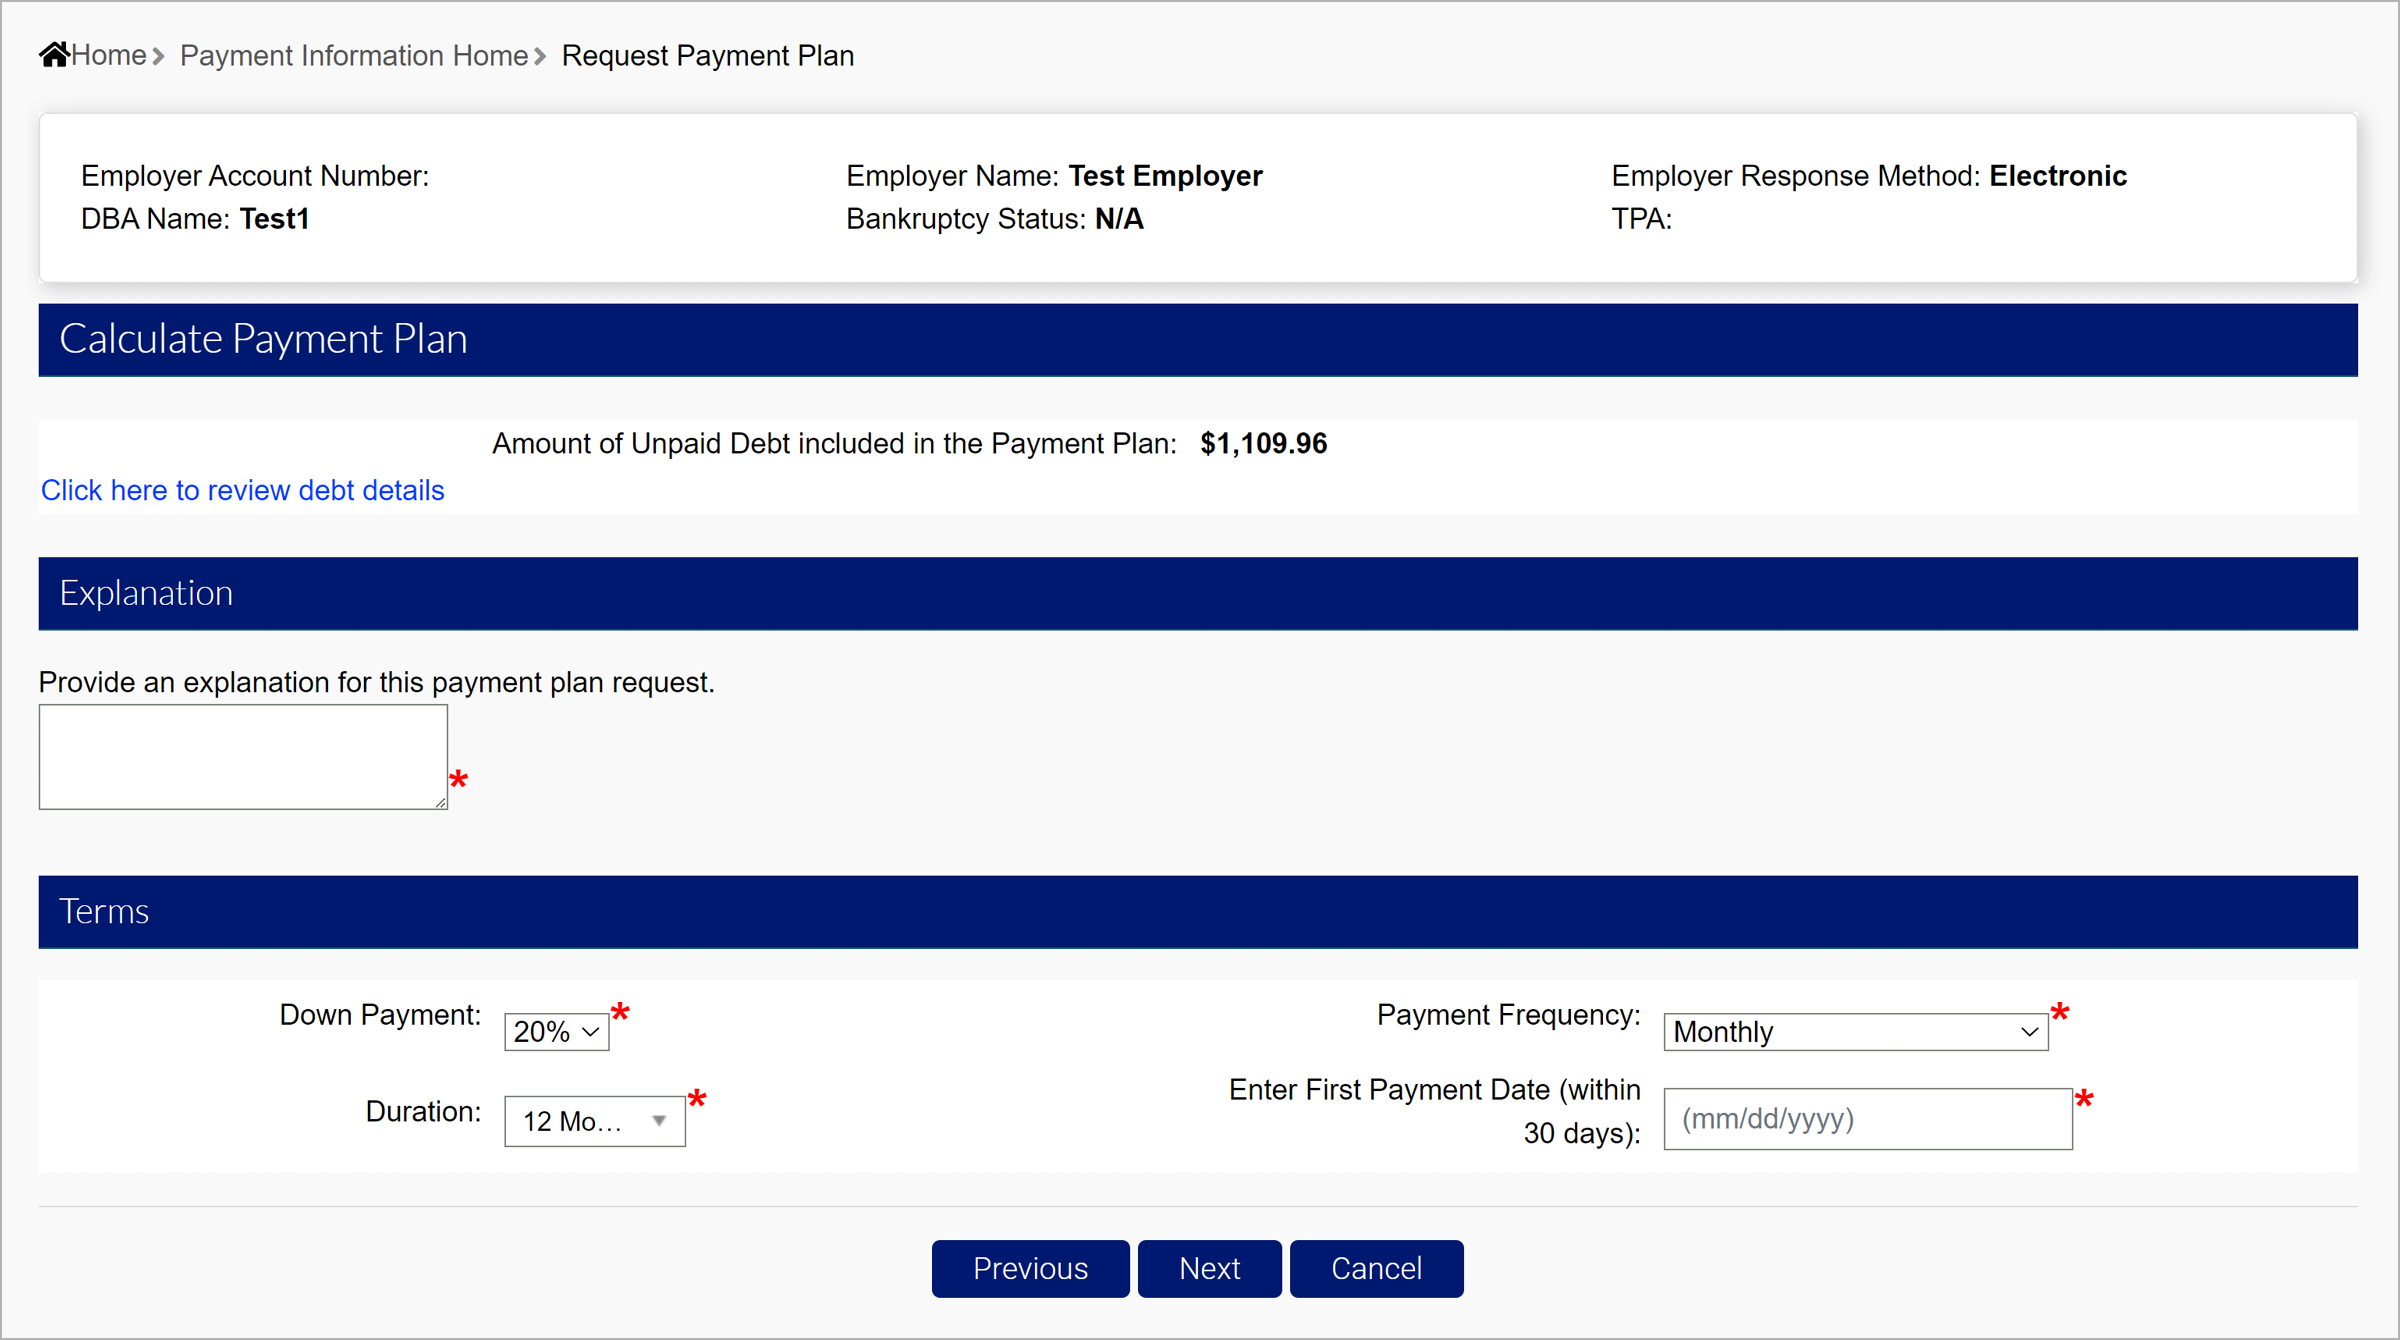
How to Request a Payment Plan
If you are unable to pay your entire account balance, you can request a payment plan inside MyUI Employer+. Payment plans are approved at the discretion of the Division.
Step 1. Access Payment Plans
- From the Employer Home page, click the “Payment Information Home” tab in the left-hand navigation menu.
- Click the “Request Payment Plan” subtab.
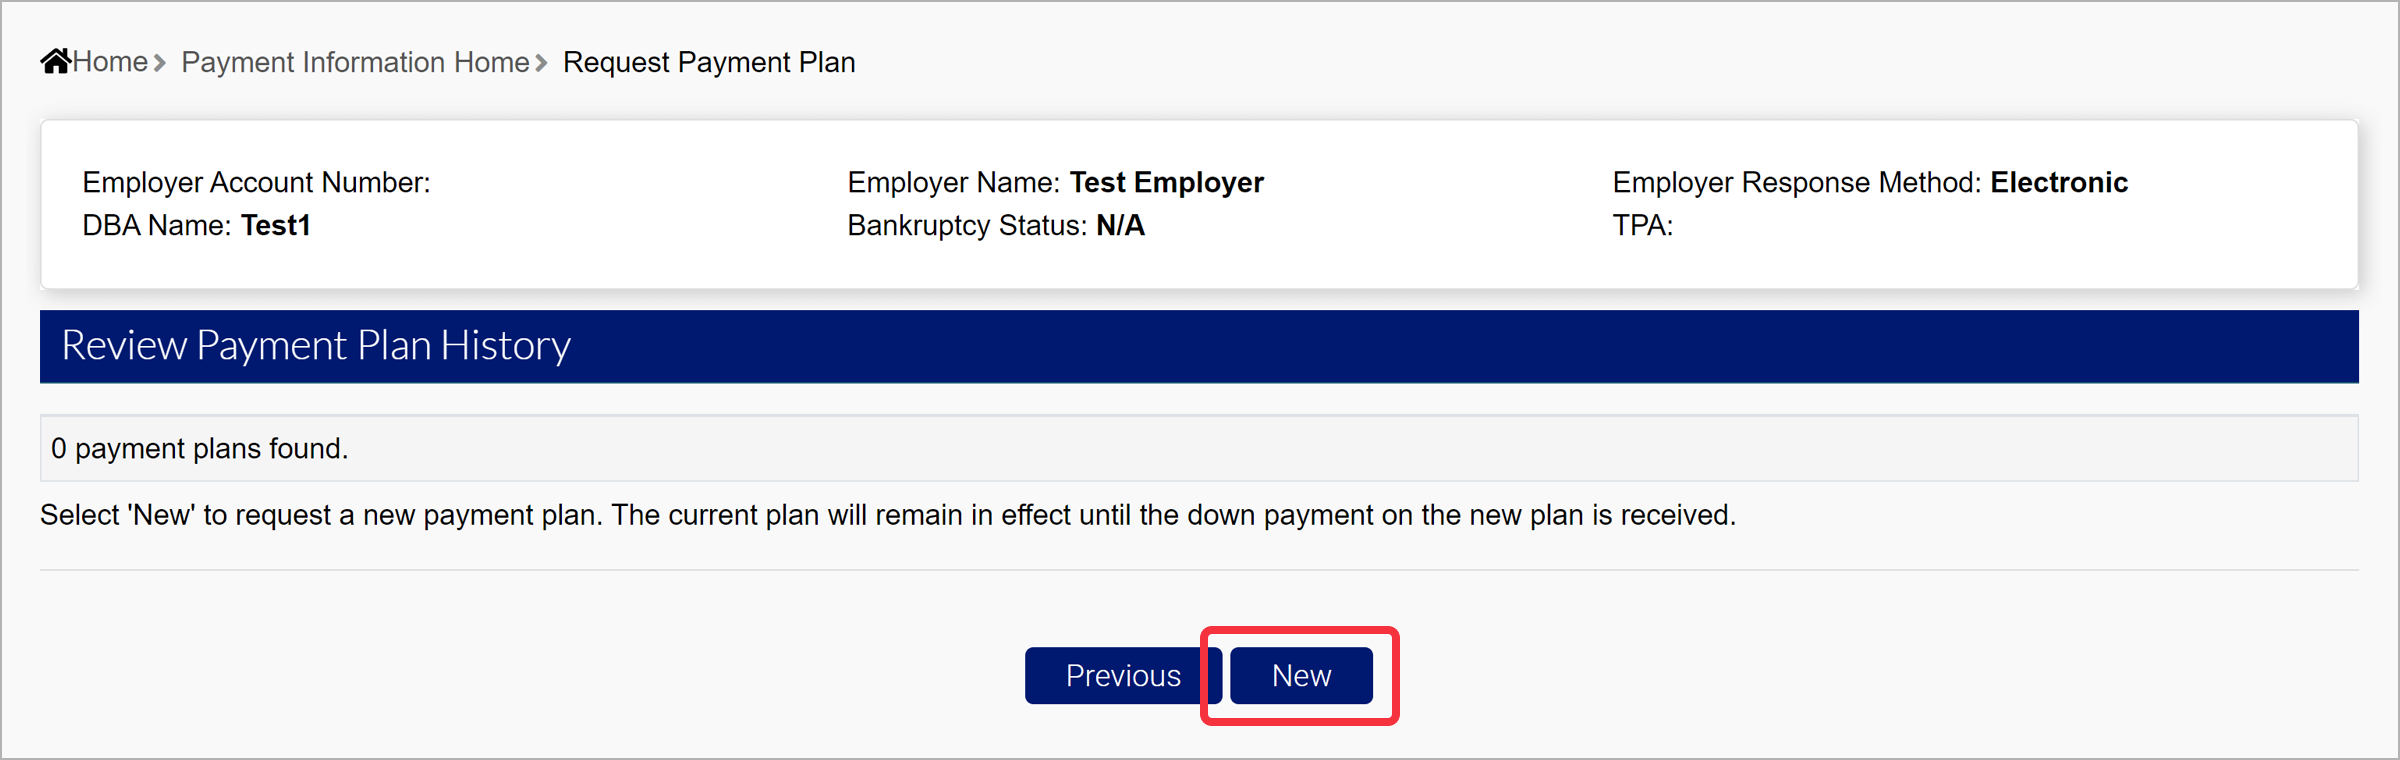
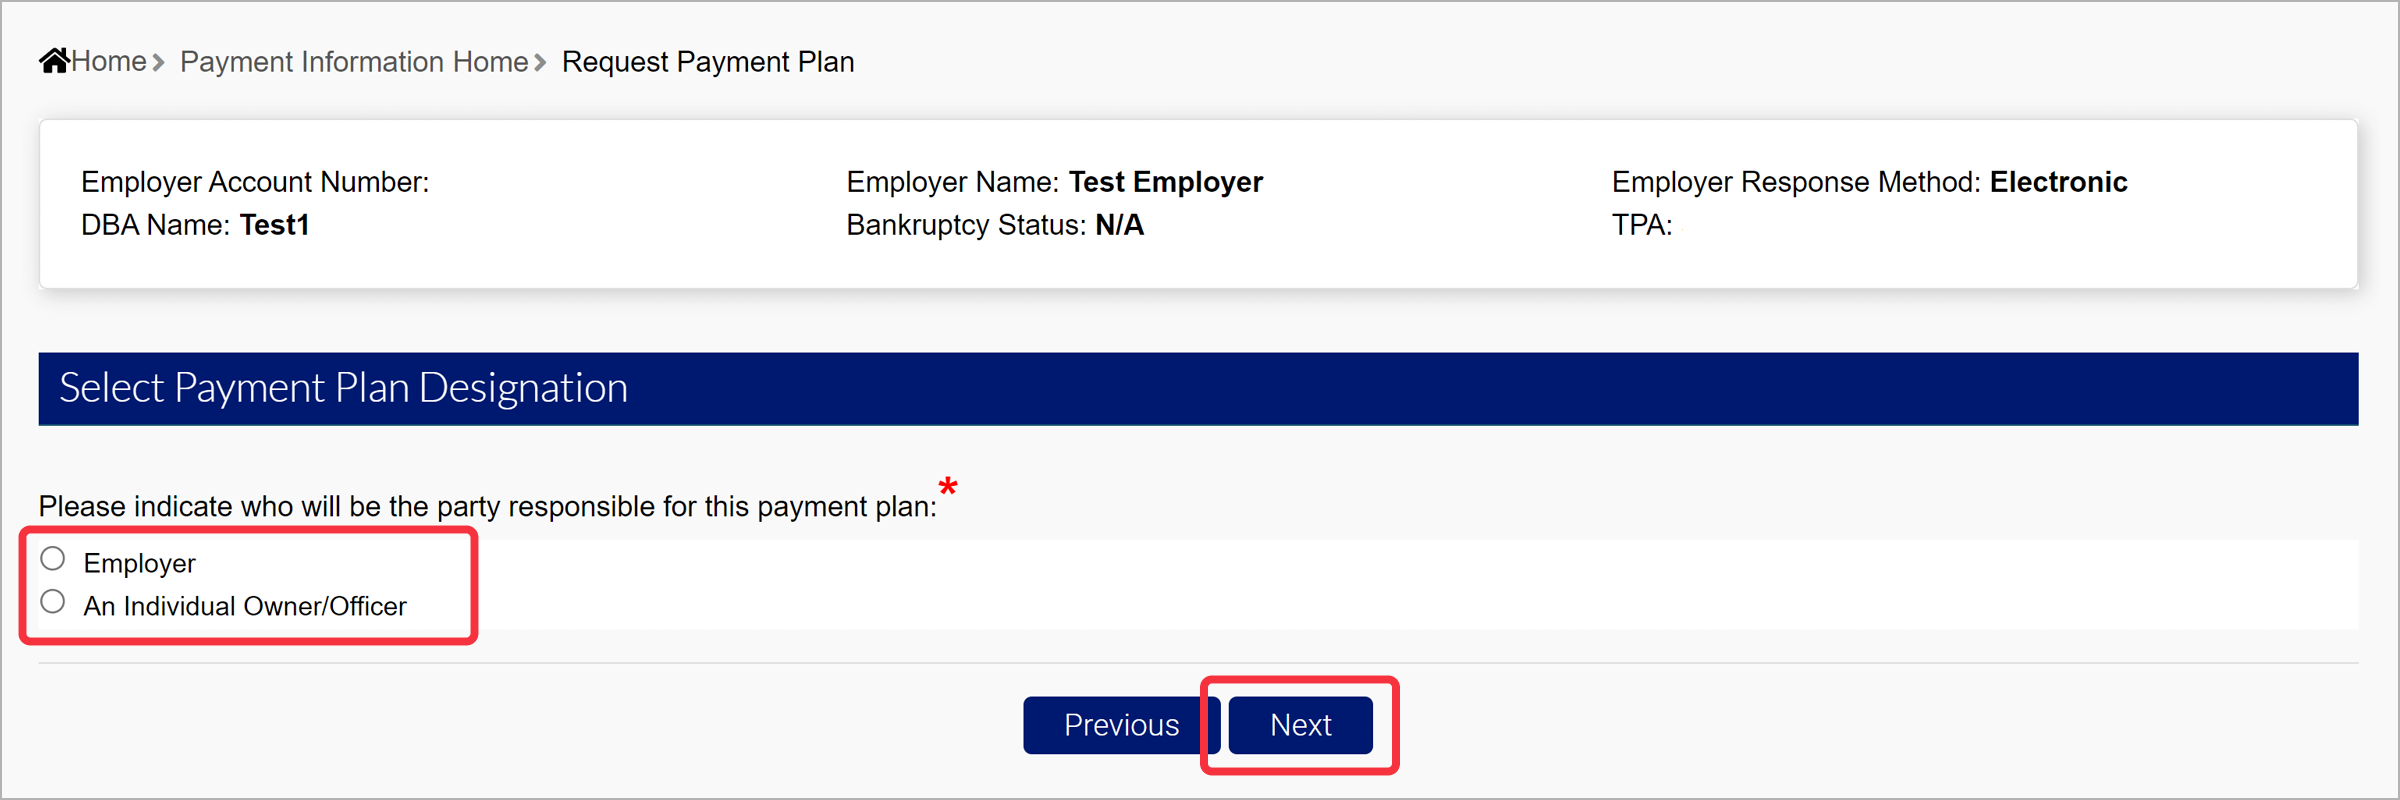
Step 2. Set Up Your Plan
- Click “New” to set up a new payment plan.
- Select the party responsible for the payment.
- Click “Next”.
The amount of the unpaid debt included in the payment plan is displayed in the Calculated Payment Plan section of the screen.
- Enter an explanation for the payment plan request in the field provided.
- Select the terms of the plan using the provided dropdowns.
- Click “Next”.
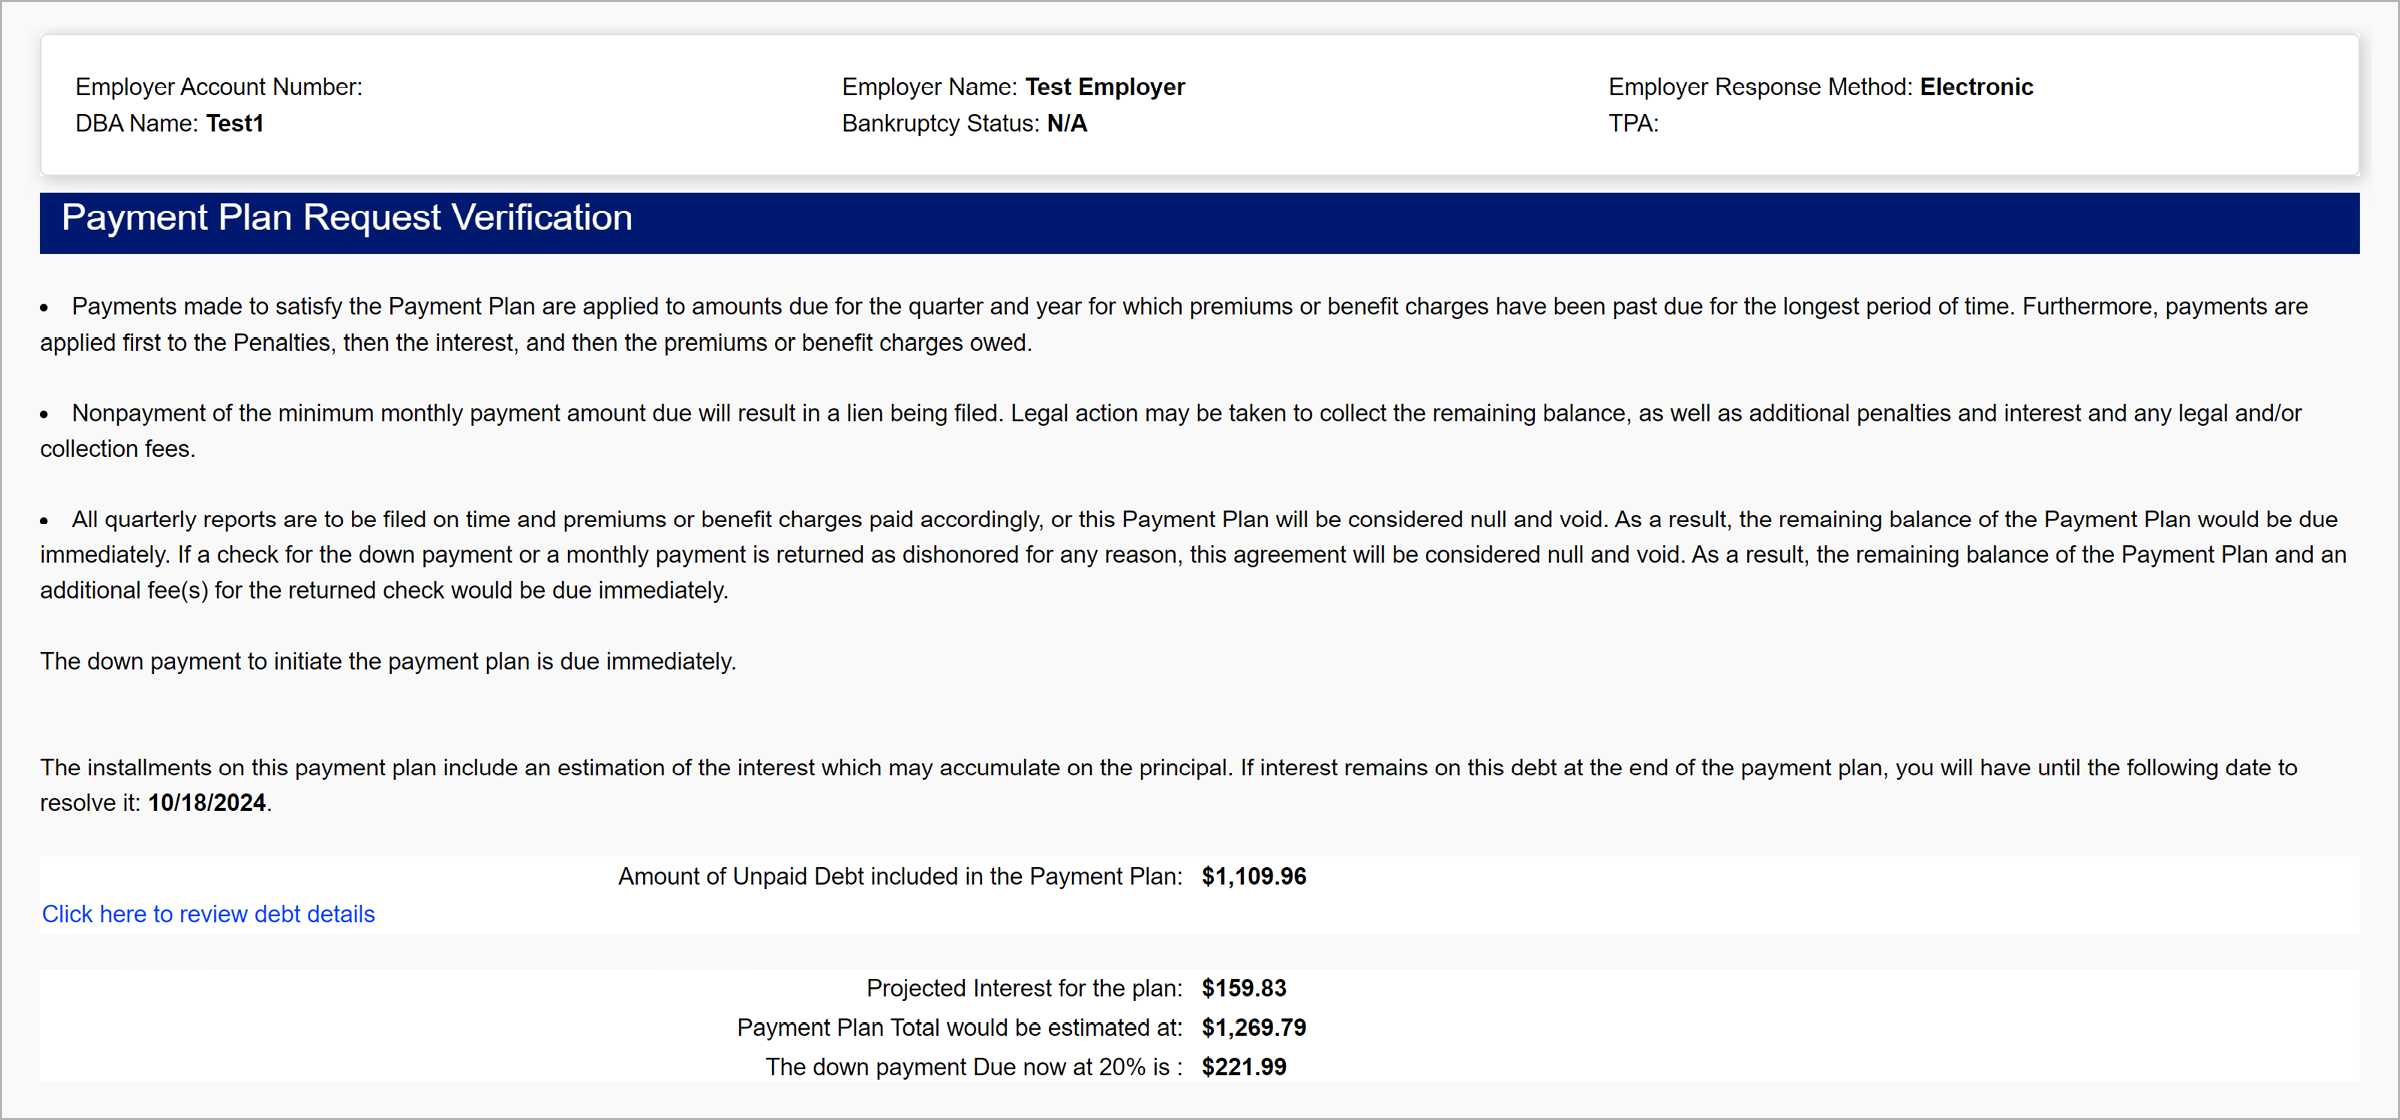
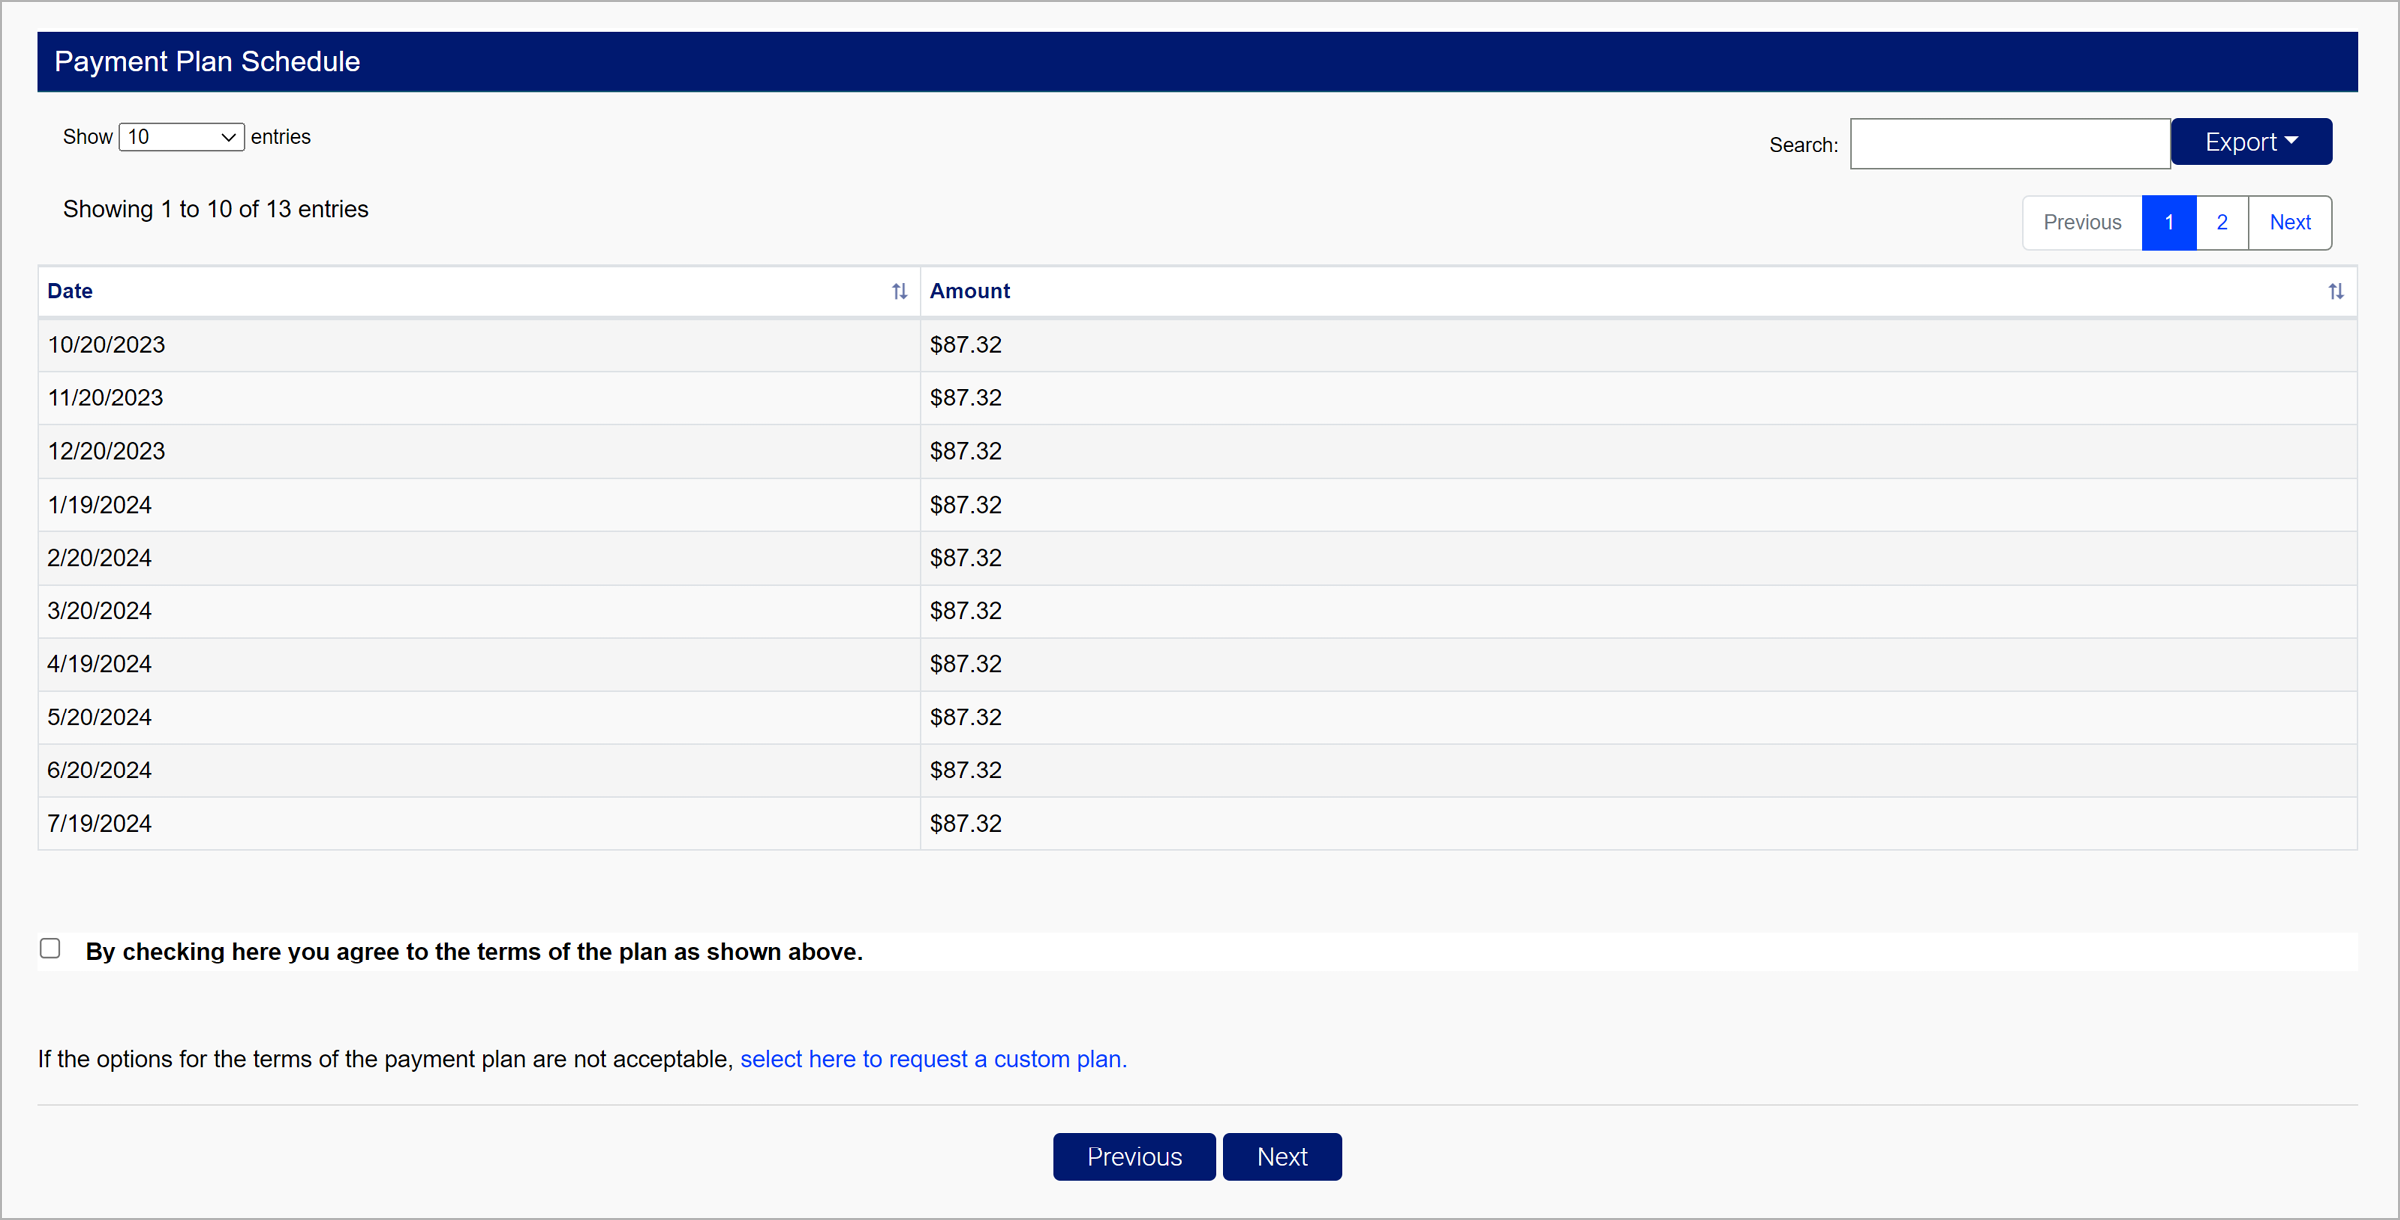
- Review the information provided in the Verification screen and the Payment Plan Schedule.
- Select the checkbox to agree to the terms of the plan.
Note: If you select the hyperlink to request a custom payment plan, you will be redirected to another screen to provide a reason why the standard payment plan options aren’t acceptable, and request more specific terms. Custom payment plan requests will be reviewed by Division staff.
- Click “Next”.
Step 3. Activate Your Payment Plan
- Click “Make Payment” to activate the payment plan and navigate to the payment screens.
Note: A down payment must be paid immediately to activate the plan.
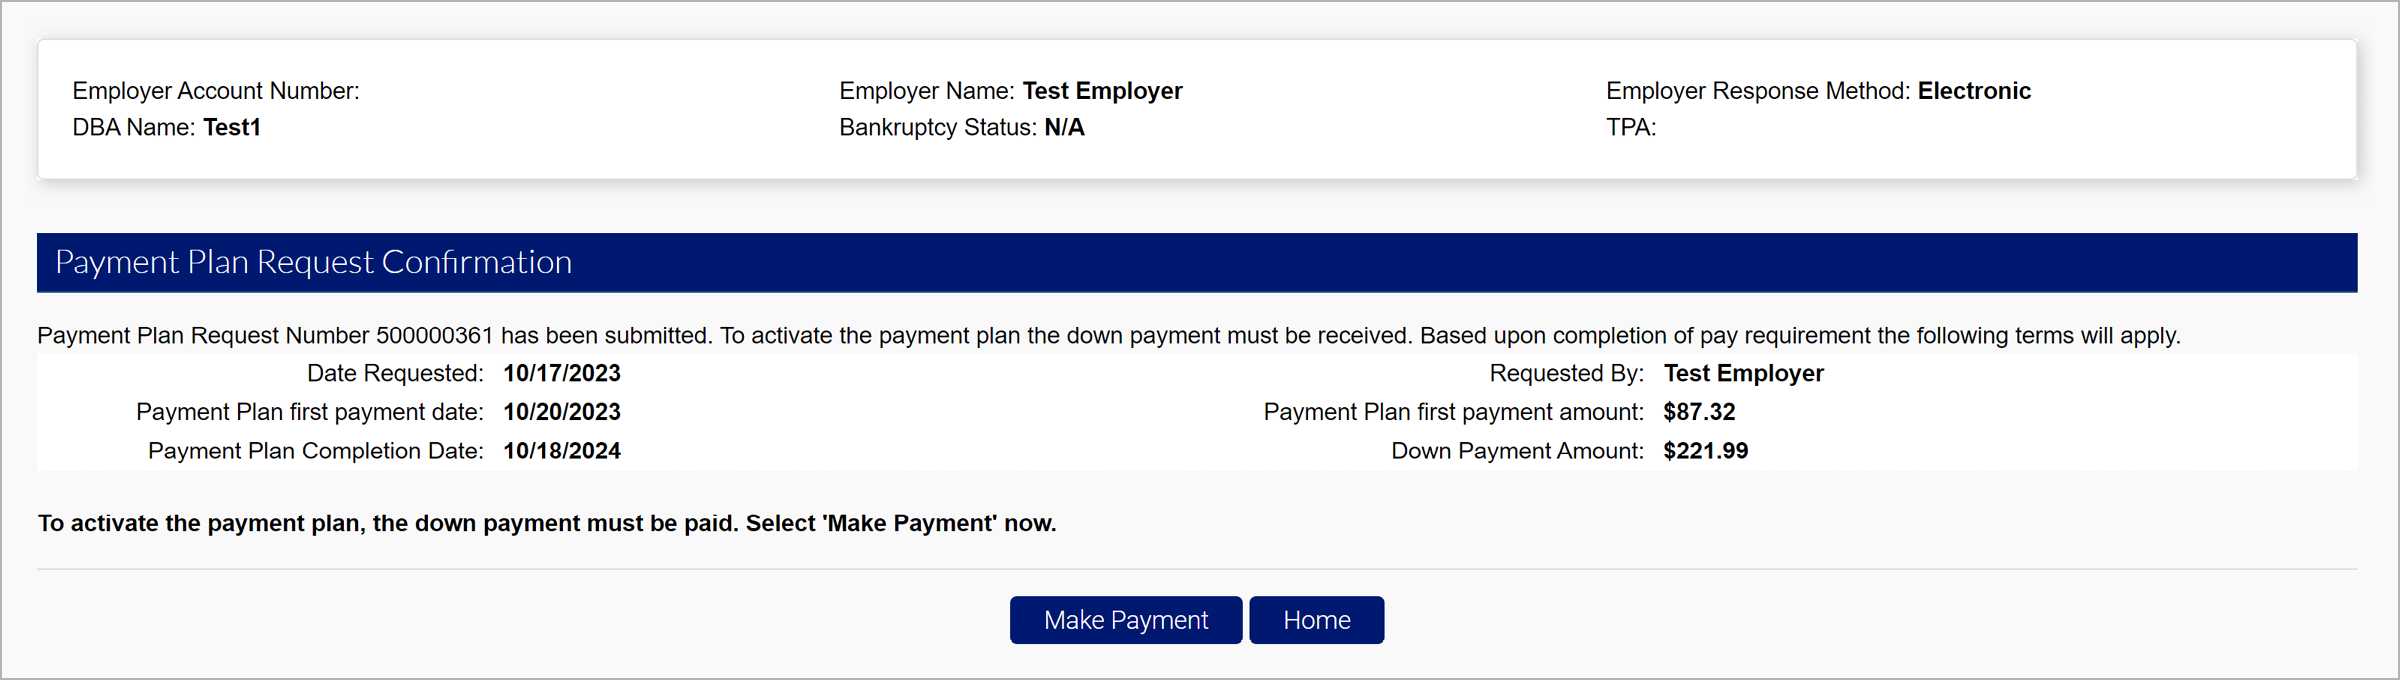
Payments must be made according to the terms of the payment plan. Reminders will be sent when upcoming payments are due.
How to Cancel a Payment
Scheduled payments can be canceled until 6:00 p.m. (MST) the day before the effective date of the payment.
Step 1. Locate Eligible Payments
- From the Employer Home page, click the “Payment Information Home” tab in the left-hand navigation menu.
- Click the “Cancel Payments” subtab.
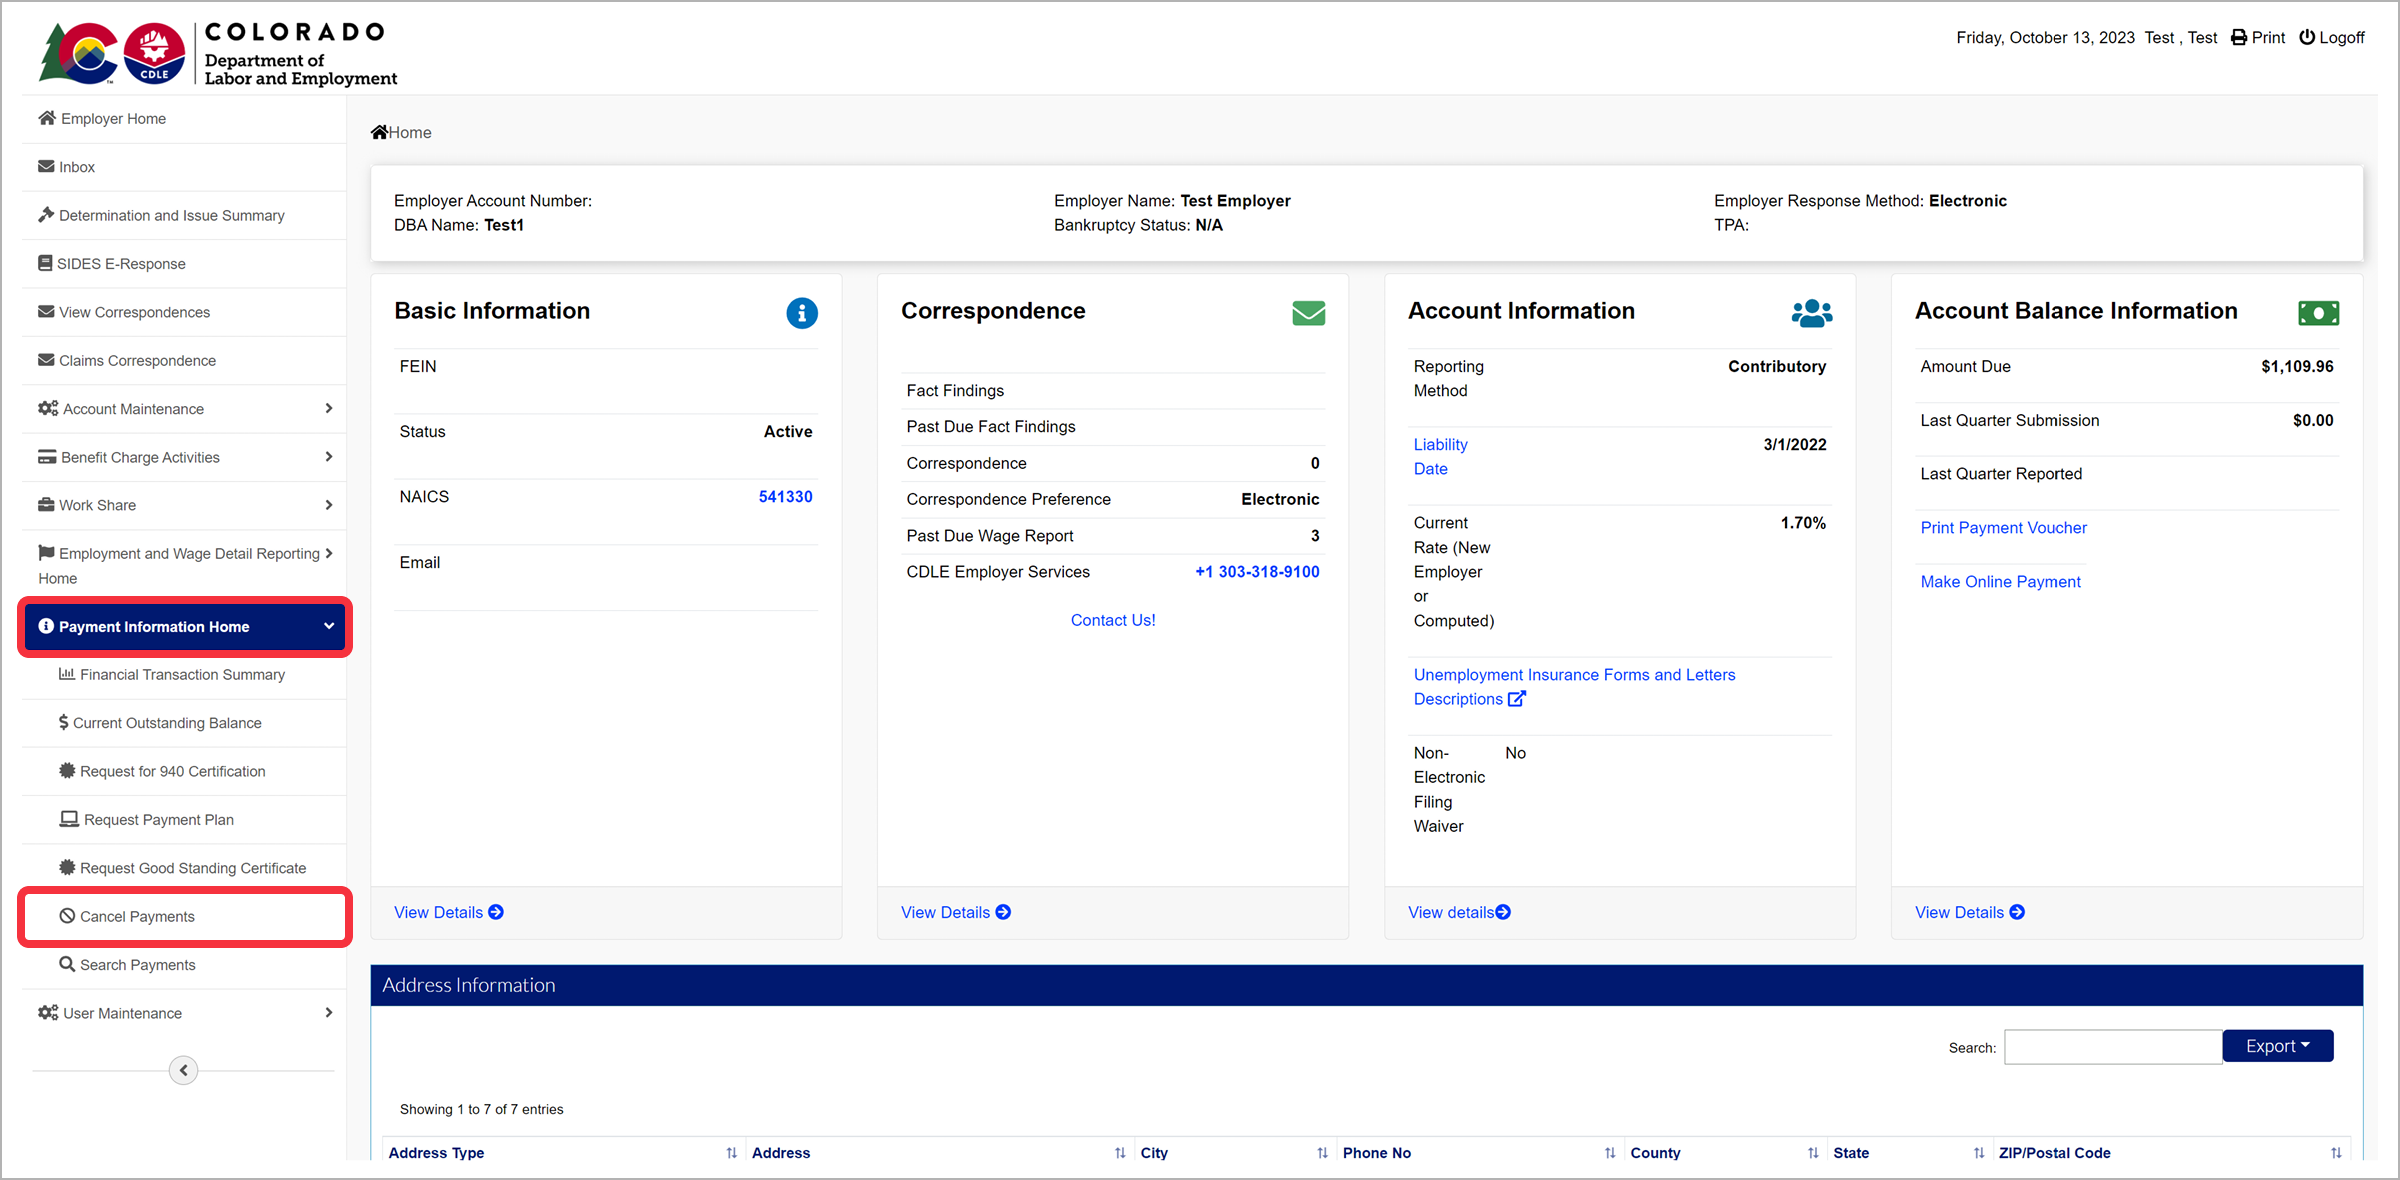
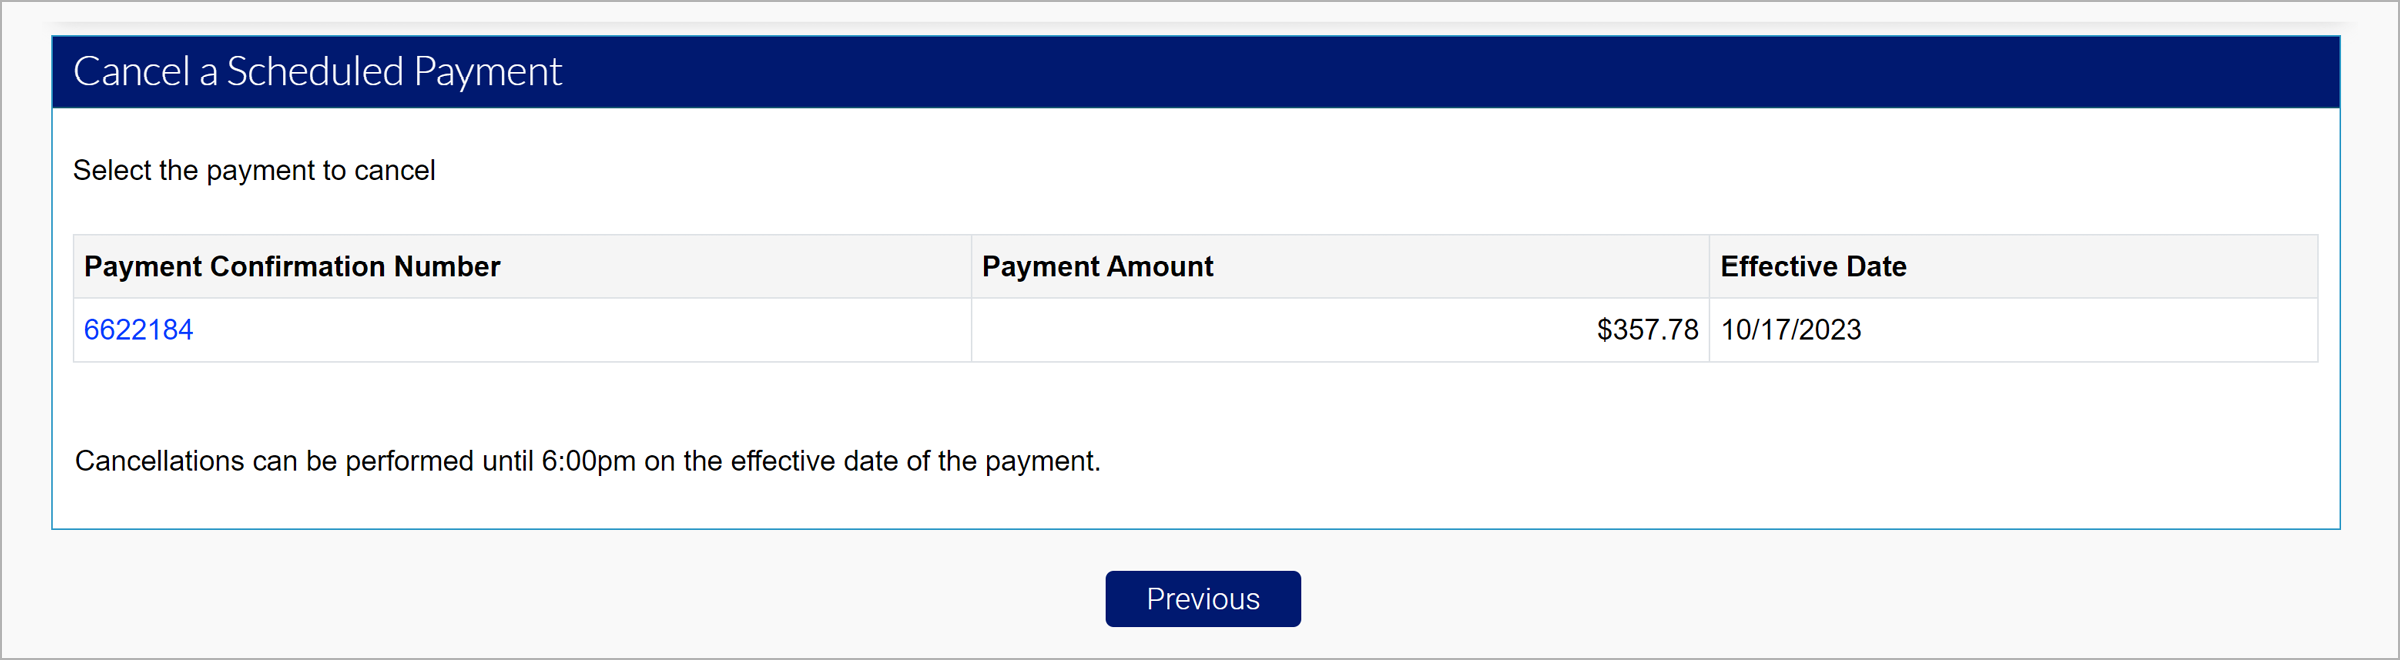
The Cancel a Scheduled Payment screen shows payments that are eligible for cancellation.
Step 2. Select a Payment to Cancel
- Click the payment confirmation number hyperlink of the payment you wish to cancel.
Step 3. Cancel the Payment
- Enter a reason for the cancellation in the field provided.
- Click “Submit” to cancel the payment.
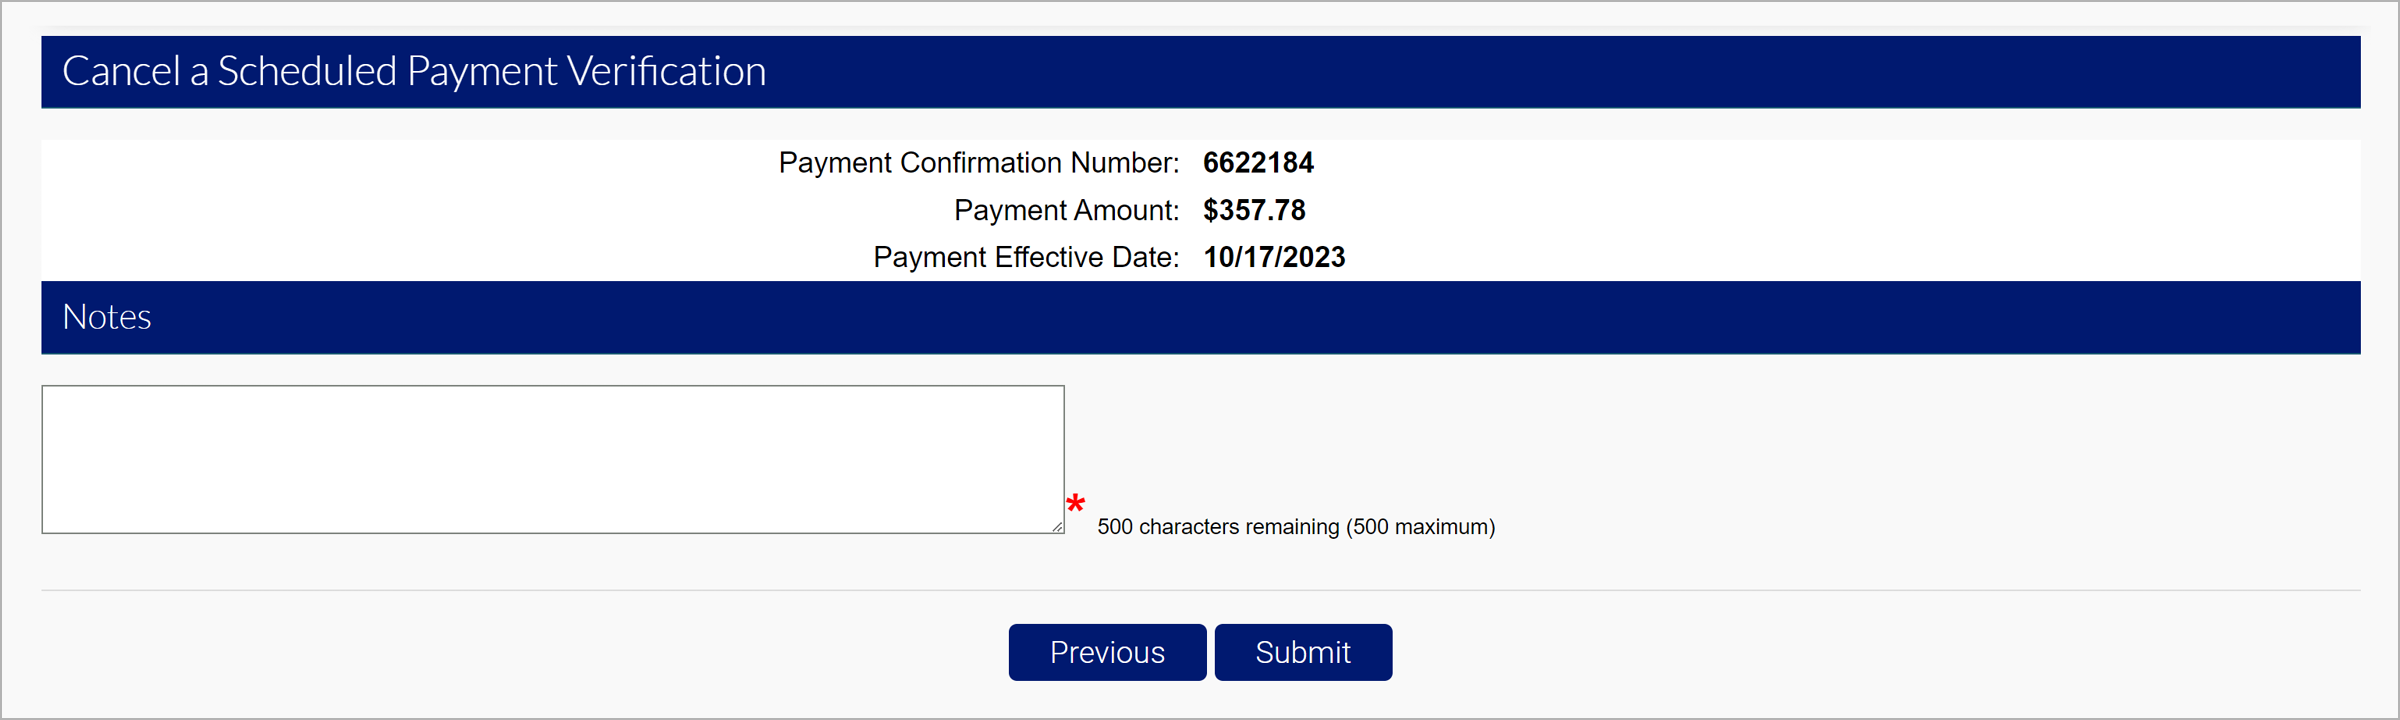
A confirmation screen will indicate you have successfully canceled the payment.

Interest and Penalties
Penalties and interest applied to your account can be viewed in the “Financial Transaction Summary” screen in MyUI Employer+.
Penalties
A $50 penalty is assessed for each quarter an Unemployment Insurance Report is delinquent. If you are a newly-liable employer, the penalty is $10 for each occurrence during the first four quarters of coverage.
If you owe delinquent premiums as of the annual computations date (June 30), you are assessed a delinquent premium penalty equal to the amount of past-due premiums, or 1 percent (0.01) of the taxable payroll, whichever is less. This penalty is billed and payable in four quarterly installments.
Interest
Interest is charged at a rate of 1.5 percent (0.015) per month or any portion of a month on past-due premiums and penalties.
- To view information related to penalties or interest, click the “Payment Information Home” tab in the left-hand navigation menu.
- Click the “Financial Transaction Summary” subtab.
- Click the blue “Interest” or “Penalties” links to view the information for the selected quarter and year.
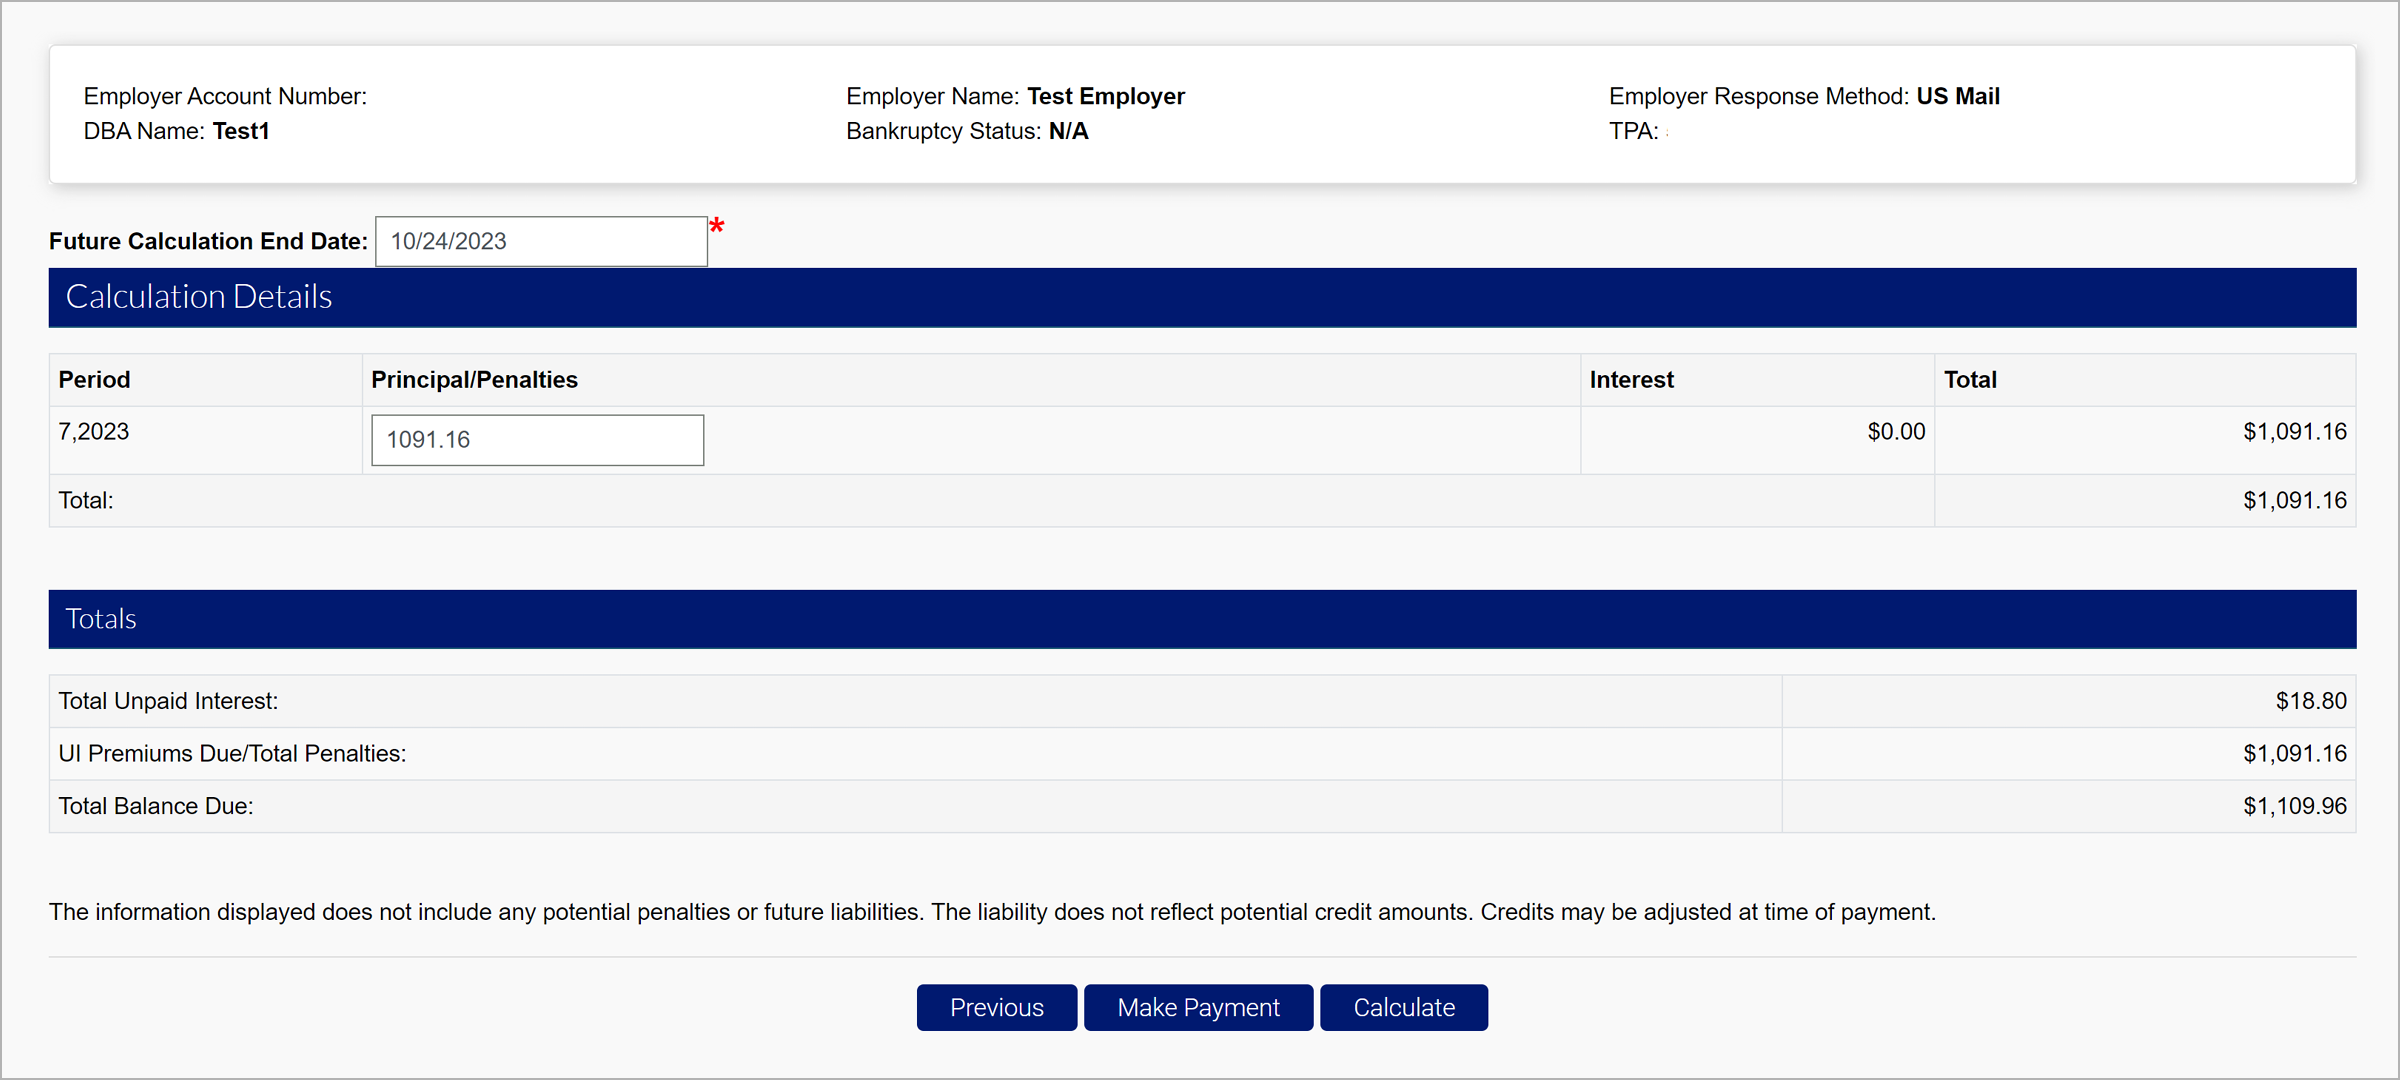
- Click “Interest Calculator” to calculate what the interest will be based on the premium payment date.